PiPiece
A Raspberry Pi-based camera control system designed for astrophotography, featuring a web-based interface for controlling the Raspberry Pi HQ Camera.
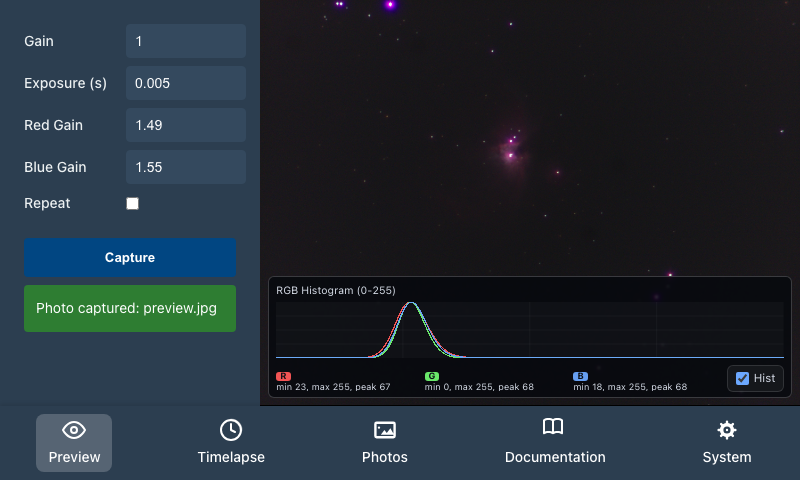 PiPiece running on Raspberry Pi with HyperPixel4 touchscreen
Overview
PiPiece combines a powerful Express.js REST API backend with a modern Vue.js touchscreen interface to provide comprehensive control over the Raspberry Pi HQ Camera. The system is optimized for use with the PiPiece 3D printed case and HyperPixel4 display, creating a portable, self-contained imaging platform.
While designed primarily for astrophotography applications, the flexible architecture makes it suitable for any scenario requiring precise camera control, long exposures, and automated image capture.
Key Features
- 📷 Full Camera Control: Exposure time, gain, white balance (red/blue gains)
- 🖥️ Touchscreen Interface: Optimized for 4" HyperPixel4 display
- 🔄 Live Preview: Continuous capture mode with auto-refresh
- ⏱️ Timelapse Support: Automated sequential imaging
- 🌐 RESTful API: Complete camera and system control via HTTP
- 📊 Server-Sent Events: Real-time status updates
- 📖 Interactive Documentation: Built-in Swagger UI API explorer
- ⚙️ System Management: Remote restart, shutdown, and updates
Architecture
┌─────────────────────────────────────────┐
│         Vue.js Web Interface            │
│  (Touchscreen-optimized for HyperPixel) │
└─────────────┬───────────────────────────┘
              │ HTTP/REST API
┌─────────────▼───────────────────────────┐
│          Express.js Server              │
│          (Port 3000)                    │
└─────────────┬───────────────────────────┘
              │ rpicam-* commands
┌─────────────▼───────────────────────────┐
│      Raspberry Pi HQ Camera             │
│       (12.3 MP, CS/C Mount)             │
└─────────────────────────────────────────┘
PiPiece on Telescope
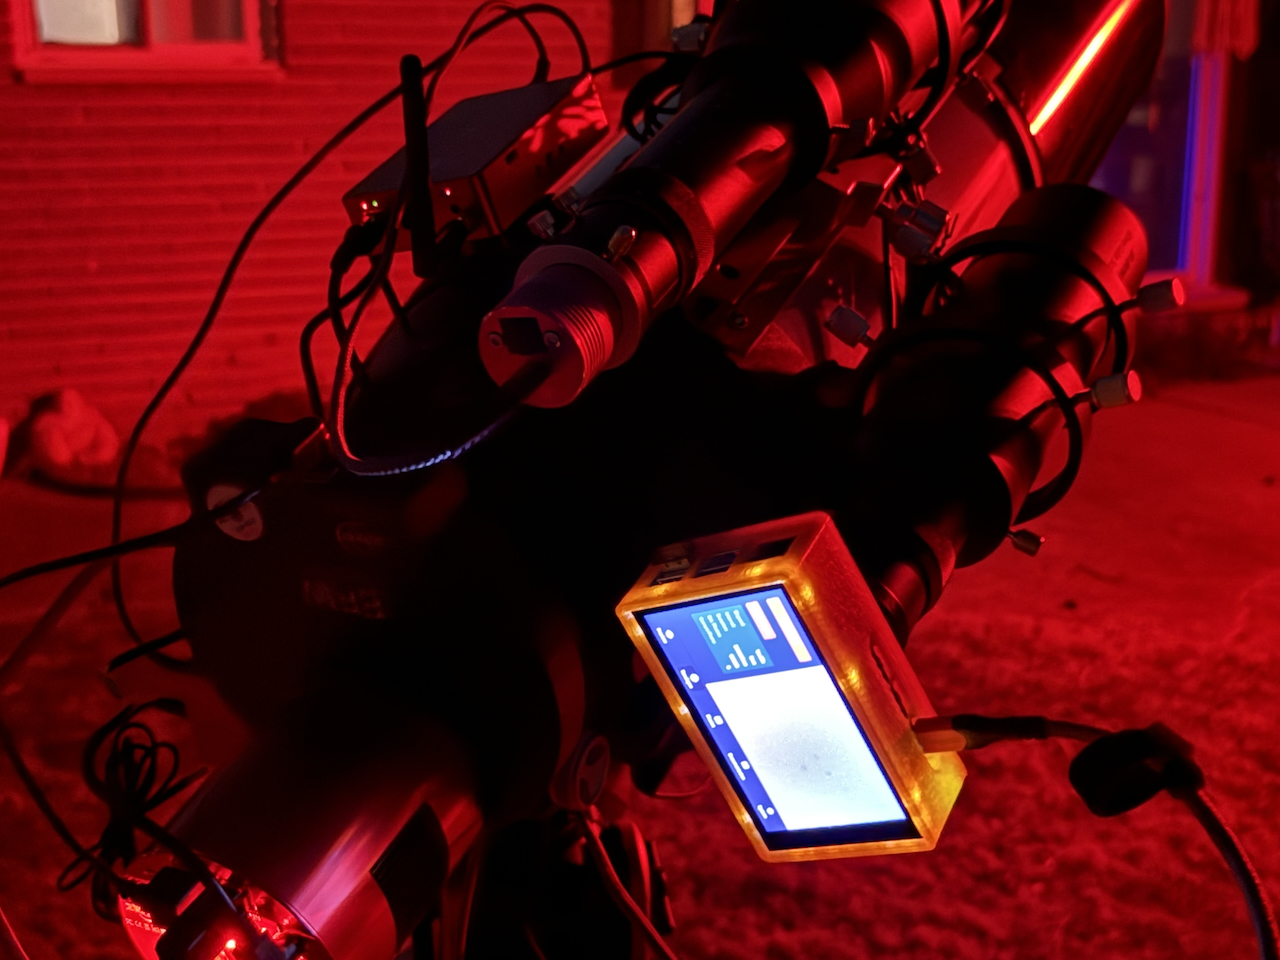 PiPiece mounted to a 60mm guidescope riding the rest of my telescope setup
Hardware Requirements
- Raspberry Pi 5 (tested) or newer
- Raspberry Pi HQ Camera (12.3 megapixel, C/CS mount)
- HyperPixel4 touchscreen display (optional but recommended)
- PiPiece Case - 3D printable design available at gitlab.com/johnwebbcole/pipiece
- SD Card (16GB minimum, 32GB+ recommended)
- Power Supply (official Raspberry Pi power supply recommended)
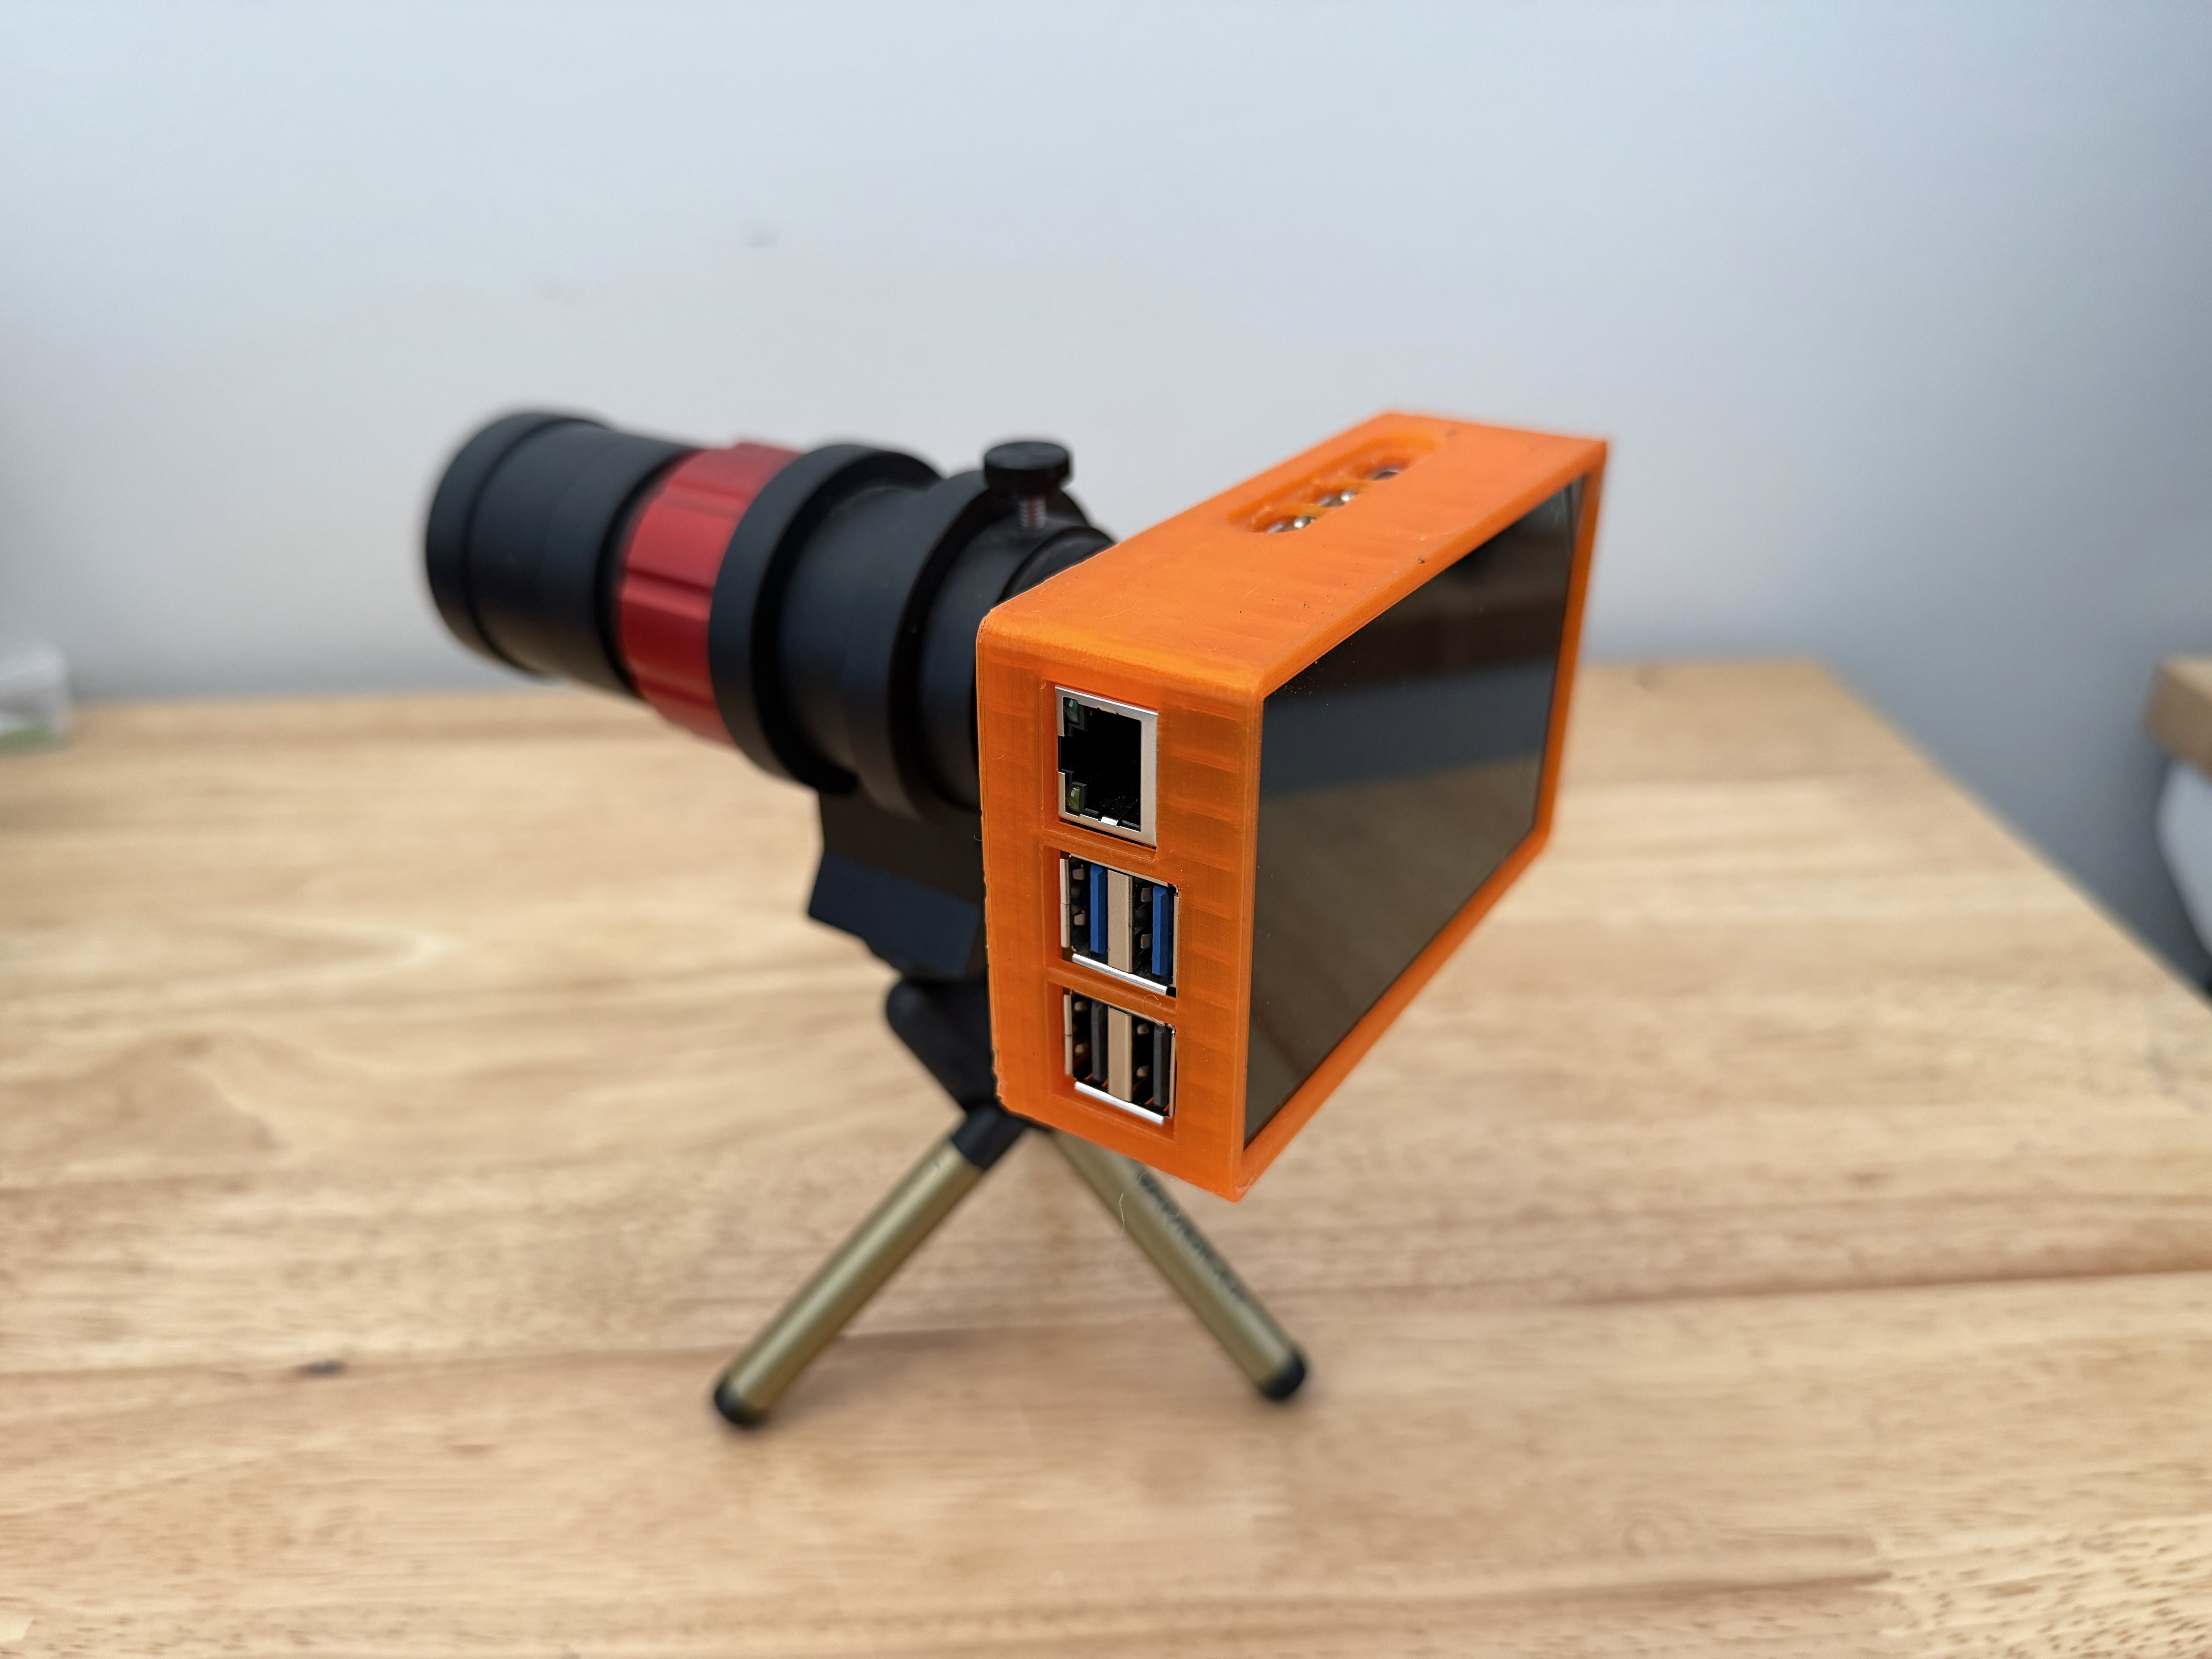 3D printed PiPiece case with HyperPixel4 display
Software Components
Backend - Express.js API Server
Located in /server, the API provides:
Camera API (
/api/camera/*)- Single photo capture with configurable settings
- Long exposure support
- Timelapse sequences
- MJPEG video streaming for focus/preview
- Camera status monitoring
System API (
/api/system/*)- System status and uptime
- Remote restart and shutdown
- Package updates with streaming output
Events API (
/api/events)- Server-sent events for real-time status
- Camera and system state monitoring
See server/README.md for API details.
Frontend - Vue.js UI
Located in /ui, the interface provides:
Preview View: Live camera control with adjustable settings
- Gain, exposure time, red/blue white balance gains
- Continuous capture mode
- Interactive settings sidebar
Focus View: MJPEG video stream for precise focusing
Capture View: Single image capture with preview
Timelapse View: Automated sequential imaging
System View: Device management and status
See ui/README.md for development details.
Quick Start
1. Hardware Setup
- Assemble your Raspberry Pi with HQ Camera and optional HyperPixel4 display
- Install Raspberry Pi OS (64-bit recommended)
- Optionally, 3D print and assemble the PiPiece case
2. System Configuration
Follow the comprehensive setup guide in setup.md which covers:
- Enabling the camera interface
- Installing Node.js 24
- Configuring PM2 process manager
- Setting up the HyperPixel4 display
- Configuring autostart and kiosk mode
Optional: Configure Chromium Kiosk Mode Autostart
To launch the PiPiece interface automatically on boot in fullscreen kiosk mode:
# Create the labwc config directory if it doesn't exist
mkdir -p ~/.config/labwc

# Copy the autostart configuration
cat config_labwc_autostart.sh > ~/.config/labwc/autostart

# Or manually edit the file
nano ~/.config/labwc/autostart
Add the following content to ~/.config/labwc/autostart:
chromium http://localhost:3000 --kiosk --noerrdialogs --disable-infobars --no-first-run --enable-features=OverlayScrollbar --start-maximized --force-dark-mode --enable-features=WebContentsForceDark --remote-debugging-port=9222 --remote-debugging-address=0.0.0.0 --force-devtools-available &This configuration:
- Opens Chromium in kiosk mode (fullscreen, no browser UI)
- Points to the local PiPiece server (localhost:3000)
- Enables dark mode for OLED display optimization
- Enables remote debugging for development
- Disables error dialogs and info bars
After configuration, reboot to test:
sudo reboot3. Quick Installation
# Clone or copy the project to your Pi
cd ~/src
# Assuming project is in ~/src/pipiece

# Install and start the server
cd ~/src/pipiece/server
npm ci
pm2 start bin/www --name "expressjs"
pm2 restart expressjs --watch
pm2 save
pm2 startup systemd  # Follow the instructions

# Build the UI (on development machine)
cd ~/src/pipiece/ui
npm ci
npm run build

# Copy ui/dist/* to the Pi at ~/src/pipiece/ui/dist/
4. Access the Interface
- Touchscreen: The UI will auto-launch in Chromium kiosk mode
- Web Browser: Navigate to
http://pipiece.localdomain:3000orhttp://<pi-ip>:3000 - API Docs: Visit
http://pipiece.localdomain:3000/api-docs
Usage
Basic Image Capture
- Navigate to the Preview view
- Adjust camera settings:
- Gain: Analog gain multiplier (higher = brighter)
- Exposure: Shutter time in milliseconds
- Red/Blue Gain: Manual white balance adjustment
- Click Capture to take a photo
- Enable Repeat for continuous capture
Focusing
- Navigate to the Focus view
- Point the camera at your target
- Adjust focus ring while watching the live MJPEG stream
- Use the zoom features to fine-tune
Timelapse
- Navigate to the Timelapse view
- Set interval and duration
- Start the sequence
- Monitor progress and stop when needed
API Access
# Capture an image
curl -X POST http://pipiece.localdomain:3000/api/camera/capture \
  -H "Content-Type: application/json" \
  -d '{"gain": 1.5, "exposure": 1000, "redGain": 2.0, "blueGain": 1.8}'

# Get system status
curl http://pipiece.localdomain:3000/api/system/status

# Stream real-time updates
curl http://pipiece.localdomain:3000/api/events
Project Goals
Learning Objective
This project serves as a comprehensive exploration of using Microsoft Copilot to develop a full-stack application, including:
- RESTful API design and implementation
- Modern frontend development with Vue.js
- Hardware interfacing with Raspberry Pi camera
- Real-time data streaming with Server-Sent Events
- Process management and system automation
- Documentation and testing practices
Future Development
The ultimate goal is to enable live viewing and capture of faint astronomical objects from a telescope, including:
- Advanced image stacking and processing
- Plate solving and automated tracking
- Deep-sky object cataloging
- Integration with telescope mounts
- Cloud storage and remote access
- Advanced focusing algorithms
Development
Start Dev Workspace (tmux)
Use the root start-dev.sh script to launch all primary development processes in a tmux tiled pane grid.
Prerequisites:
tmux- UI dependencies installed with
cd ui && npm install
Run from the project root:
./start-dev.shThe script starts these commands:
- In
ui/:./node_modules/.bin/nodemon -w ./src -w ./public --exec "npm run build" -e js,vue,md - In root:
./sync.sh - In
ui/:npm run storybook - In
ui/:npm run preview - In root:
npm run docs:dev
The script recreates the pipiece-dev tmux session on each run so the pane grid is always reset to the expected layout.
Project Structure
pipiece/
├── docs/                              # Project docs and images
├── e2e/                               # Root-level e2e artifacts
├── server/                            # Express.js REST API
│   ├── bin/                           # Server startup script
│   ├── config/                        # Environment and runtime config
│   ├── routes/                        # API route handlers
│   │   └── api/                       # Camera/system/events/file endpoints
│   ├── public/                        # Static files served by Express
│   └── package.json
├── setup/                             # Pi provisioning and helper scripts
├── ui/                                # Vue.js frontend workspace
│   ├── .storybook/                    # Storybook configuration
│   ├── e2e/                           # Playwright UI tests
│   ├── scripts/                       # Utility scripts (manifest generation)
│   ├── src/
│   │   ├── components/                # Reusable Vue components
│   │   ├── views/                     # Application views
│   │   ├── router/                    # Vue Router configuration
│   │   ├── stories/                   # Storybook assets/docs
│   │   └── utils/                     # FITS helpers and tests
│   ├── vitest-browser/                # Browser-mode component tests
│   ├── vitest.browser.config.js
│   ├── vitest.storybook.config.js
│   └── package.json
├── package.json                       # Root docs scripts (vitepress)
├── start-dev.sh                       # tmux dev workspace launcher
├── sync.sh                            # File sync script for development
├── setup.md                           # Comprehensive setup guide
├── config_labwc_autostart.sh          # Chromium kiosk mode autostart config
└── hyperpixel-rotate.sh               # Display rotation utility
Development Workflow
For active development on a local machine with live testing on the Raspberry Pi, use the following workflow:
Automatic File Sync to Raspberry Pi
The sync.sh script uses fswatch and rsync to automatically sync local changes to the Pi:
# Install fswatch (macOS)
brew install fswatch

# Make sync script executable
chmod +x sync.sh

# Edit sync.sh to match your Pi's hostname or IP
# Default uses 'pipiece' as hostname

# Start continuous sync
./sync.sh
The script will:
- Monitor the project directory for changes
- Automatically sync files to the Pi (excluding
node_modules) - Keep your Pi updated in real-time during development
Note: Ensure SSH key-based authentication is set up for passwordless rsync:
# Generate SSH key if you don't have one
ssh-keygen -t ed25519

# Copy to your Pi
ssh-copy-id pi@pipiece
Configure SSH for Remote Debugging
To enable remote debugging of the Chromium interface running on the Pi, configure SSH port forwarding:
# Edit your SSH config
nano ~/.ssh/config
Add the following configuration:
Host pipiece
  HostName pipiece.localdomain
  User pi
  IdentityFile ~/.ssh/id_rsa
  LocalForward 9222 localhost:9222
This configuration:
- Creates an SSH alias
pipiecefor easy connection - Forwards port 9222 from the Pi to your local machine
- Enables Chrome DevTools remote debugging
Using Remote Debugging:
Connect to your Pi with port forwarding:
bashssh pipieceOpen Chrome on your development machine and navigate to:
chrome://inspectClick "Configure" and add
localhost:9222if not already listedYour Pi's Chromium instance will appear under "Remote Target"
Click "inspect" to open DevTools and debug the running interface
This is particularly useful for:
- Debugging touch interactions on the HyperPixel display
- Testing responsive layouts
- Monitoring console logs and network requests
- Profiling performance on the Pi hardware
Auto-Rebuild Vue.js UI
For continuous UI development, use nodemon to automatically rebuild when files change:
cd ui

# Install UI dependencies if not already installed
npm install

# Watch for changes and rebuild automatically
./node_modules/.bin/nodemon -w ./src -w ./public --exec "npm run build" -e js,vue,md
This command:
- Watches all files in
./srcand./publicdirectories - Triggers
npm run buildon any.js,.vue, or.mdfile change - Combined with
sync.sh, changes are automatically built and synced to the Pi
Complete Development Setup
Open three terminal windows:
Terminal 1 - File Sync:
./sync.shTerminal 2 - Auto-Build UI:
cd ui
nodemon -w ./src -w ./public --exec "npm run build" -e js,vue,md
Terminal 3 - Monitor Pi Server:
ssh pi@pipiece
pm2 logs expressjs
With this setup:
- Edit files locally in your IDE
- UI rebuilds automatically on save
- Changes sync to the Pi instantly
- Refresh browser to see updates (or use the auto-reload script on the Pi)
Alternative: Local Development Server
For UI-only development without the Pi:
cd ui
npm run dev
This runs Vite's dev server with hot-reload. You'll need to proxy API requests to your Pi or mock the API endpoints.
Contributing
This is a learning project, but contributions, suggestions, and feedback are welcome!
- Fork the repository
- Create a feature branch
- Make your changes
- Submit a pull request
Troubleshooting
Camera Issues
# Test camera
rpicam-hello

# Check for stuck processes
ps aux | grep rpicam
kill <PID>

# Enable camera in raspi-config
sudo raspi-config
Server Issues
# Check PM2 logs
pm2 logs expressjs

# Restart server
pm2 restart expressjs

# Check port availability
sudo lsof -i :3000
Display Issues
# Check display configuration
grep dtoverlay /boot/firmware/config.txt

# Rotate display
./hyperpixel-rotate.sh
See setup.md for detailed troubleshooting.
Screenshots
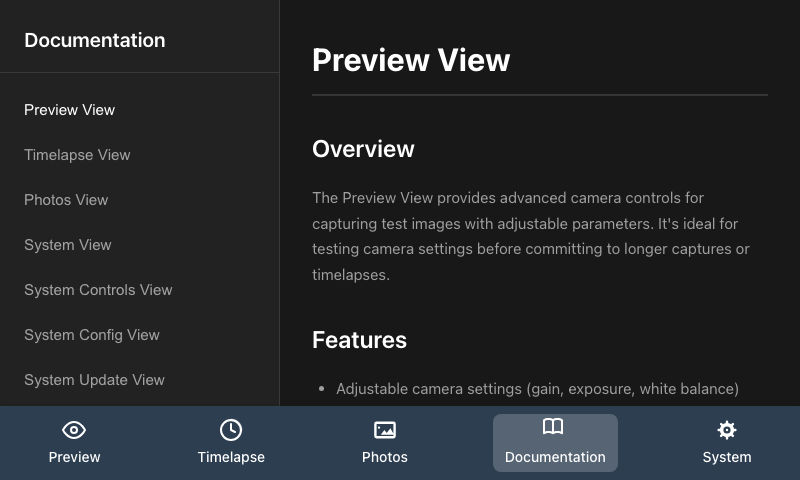
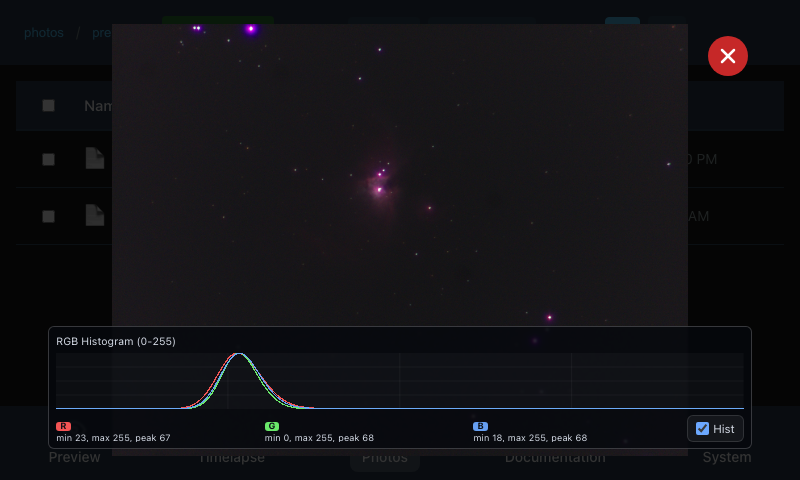
Preview Interface
Camera control interface with live preview and settings
Timelapse Interface
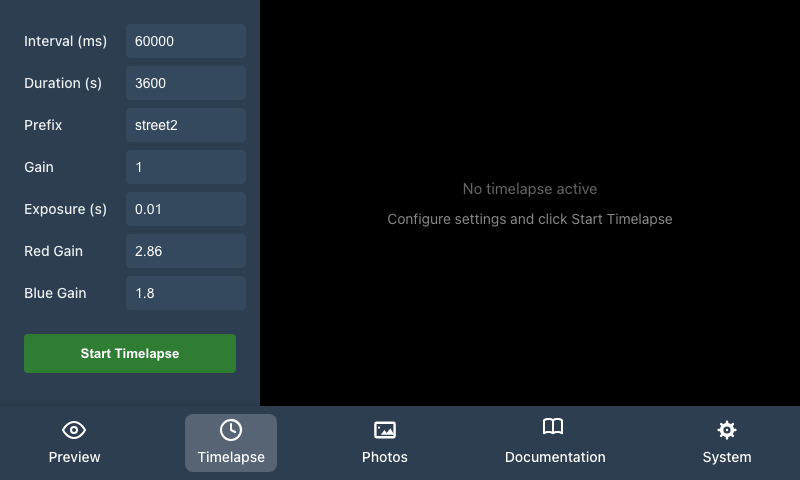 Timelapse controls with live image updates
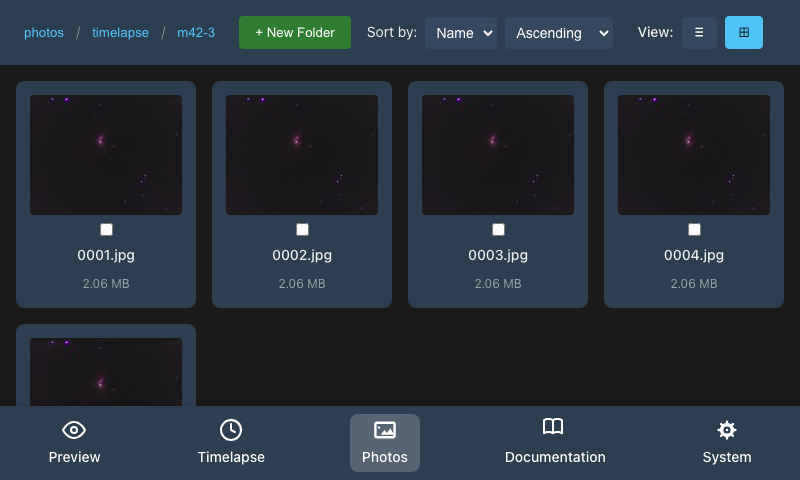
Photos Interface
 Photo browser with thumbnail and list views
API Documentation
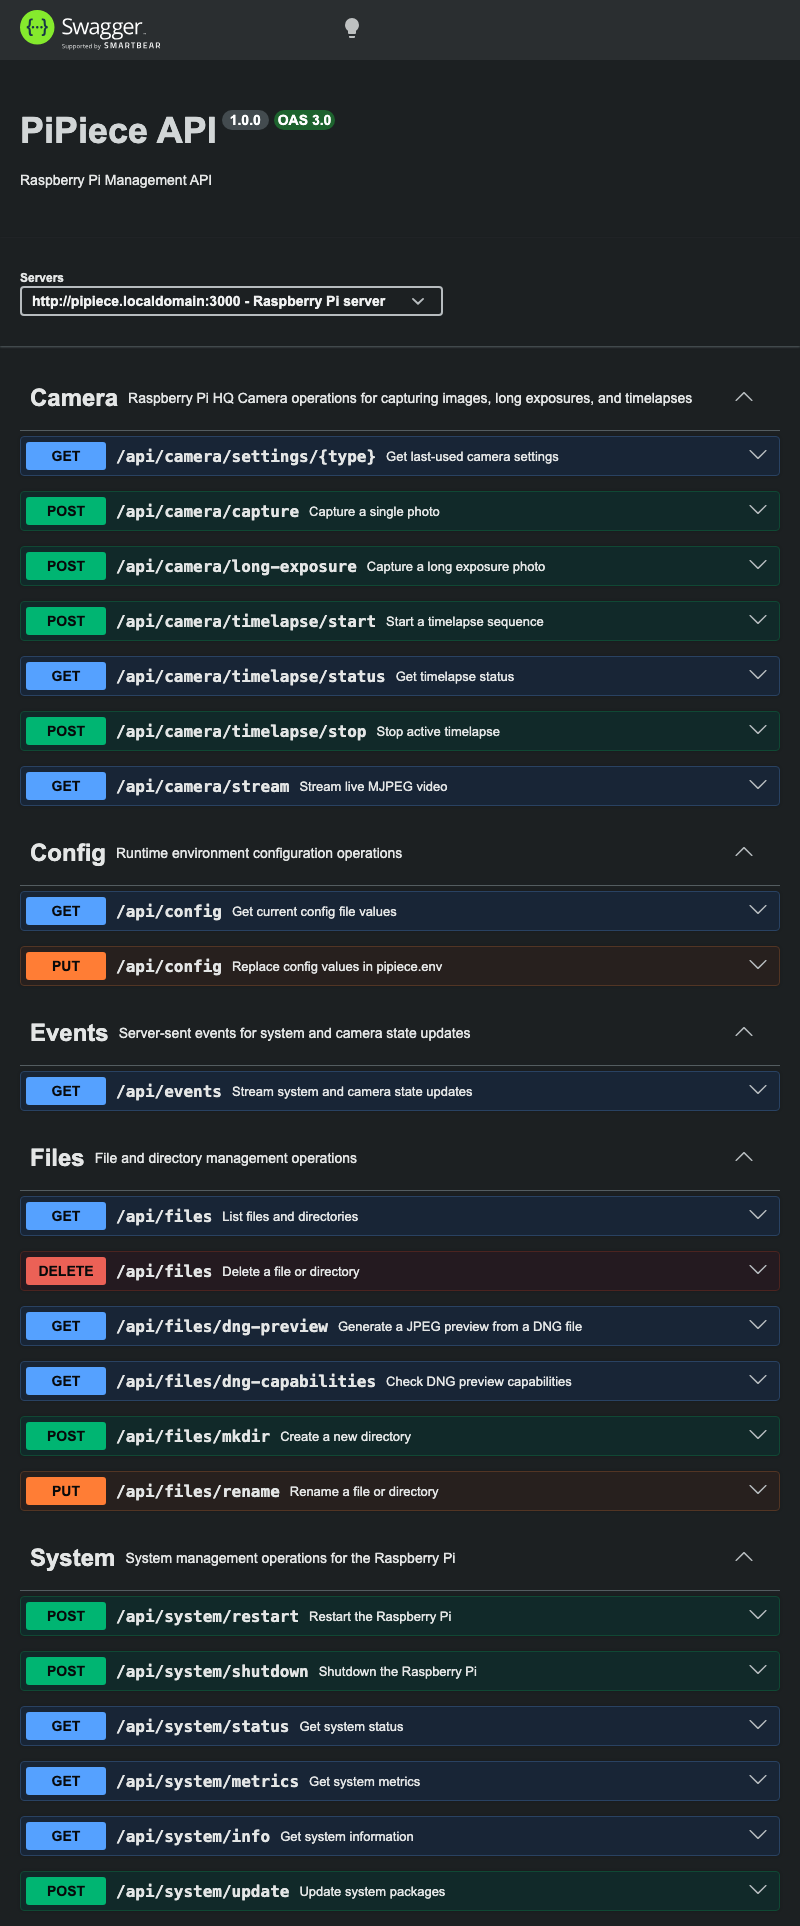 Interactive API documentation with Swagger UI
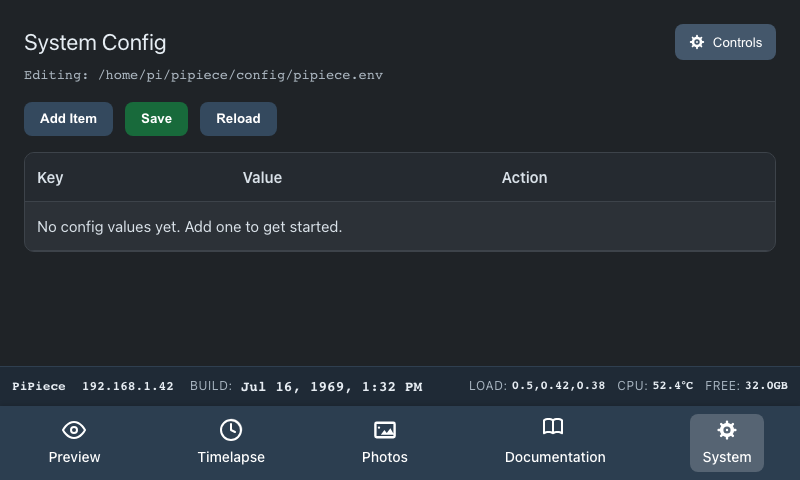
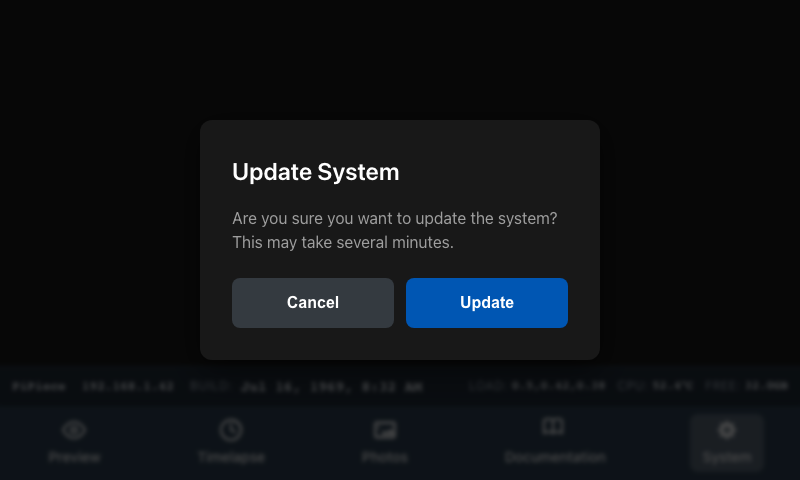
System Management
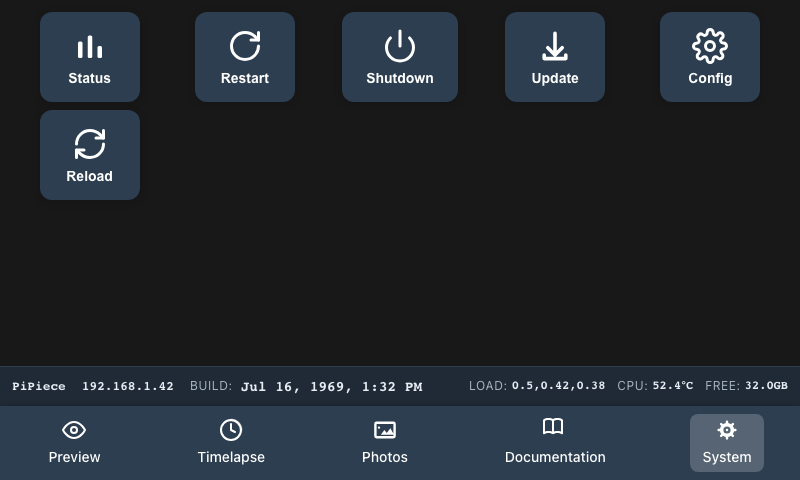 System status and management interface
Additional UI Screenshots
Generated from ui/e2e/views.spec.js snapshots and copied into docs/images.
Direct View Captures
Photos Flow Captures
License
This project is developed for educational purposes. See individual component licenses for details.
Acknowledgments
- HyperPixel4: Display by Pimoroni
- Raspberry Pi Foundation: For the amazing platform and camera module
- Vue.js & Express.js Communities: For excellent frameworks and documentation
- Microsoft Copilot: For AI-assisted development support
Related Projects
- PiPiece Case Design - 3D printable enclosure
- Raspberry Pi HQ Camera - Official camera module
- HyperPixel4 - Touchscreen display
Status: Active Development | Version: 0.1.0 | Last Updated: February 2026