PiPiece
A Raspberry Pi-based camera control system for astrophotography and wildlife monitoring, featuring a web-based interface for the Raspberry Pi HQ Camera.
Getting started? See the Quickstart Guide to get running in minutes.
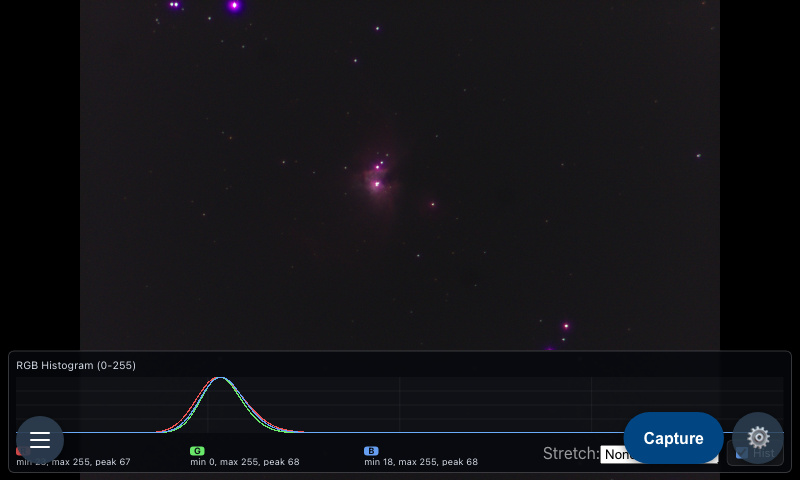 PiPiece running on Raspberry Pi with HyperPixel4 touchscreen
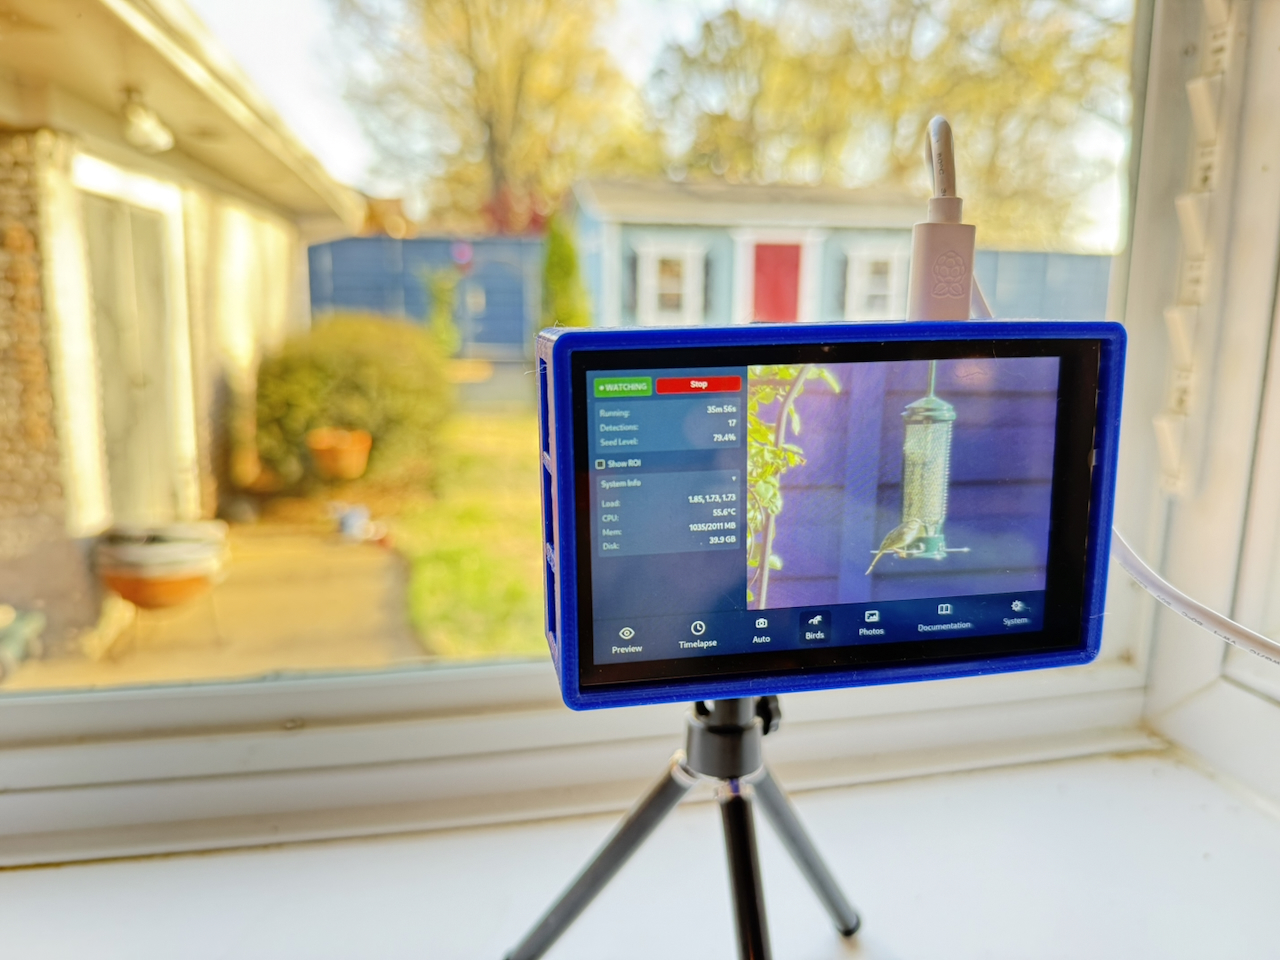
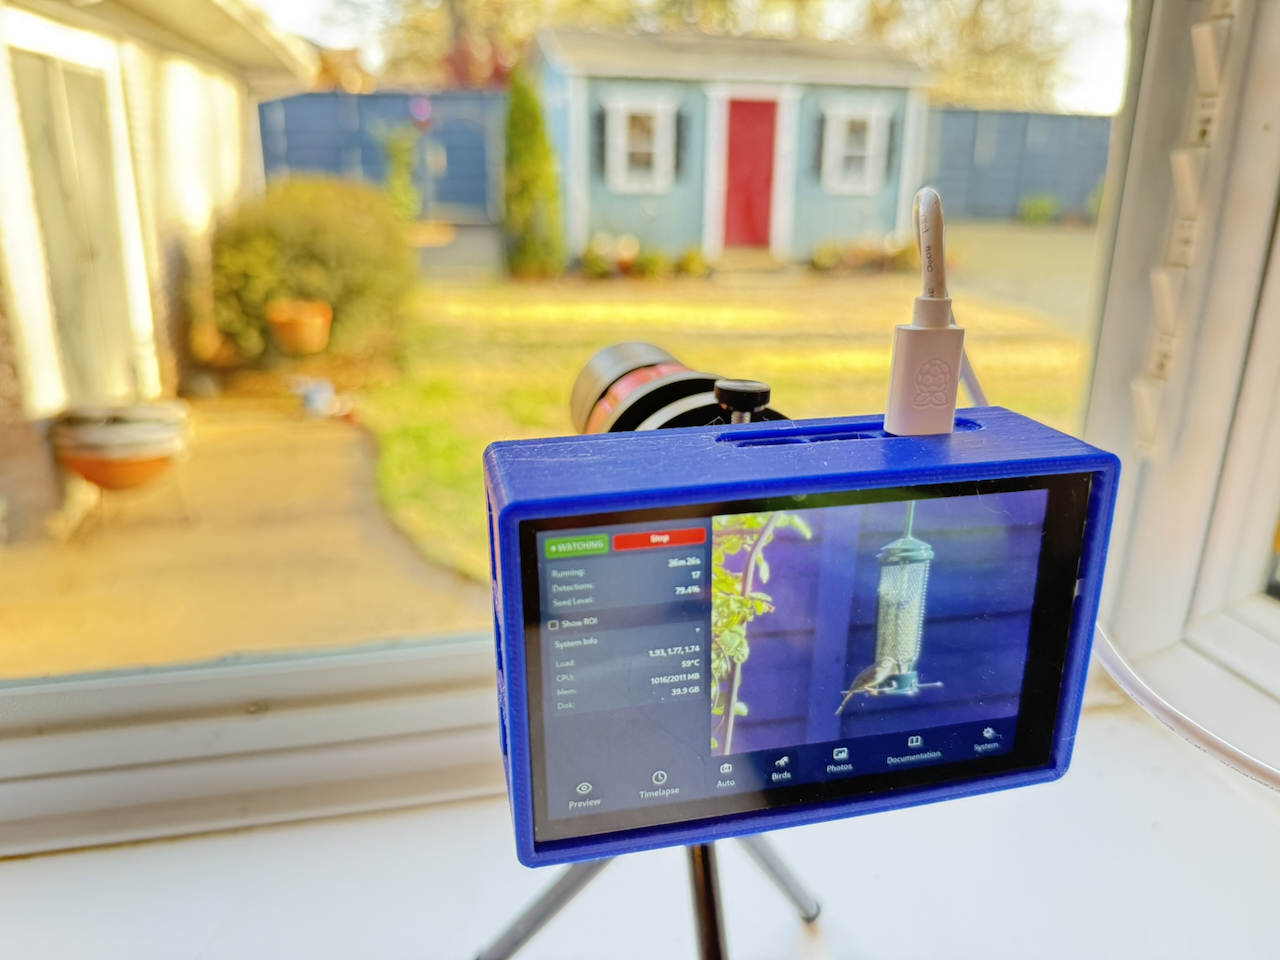
Bird Watcher Feature
PiPiece includes an AI-powered bird watcher that runs directly on the Raspberry Pi using the LiteRT on-device inference runtime. Point the camera at a bird feeder and the system automatically detects and photographs every visitor.
 |  |
| Real captures from PiPiece — birds detected and photographed automatically |
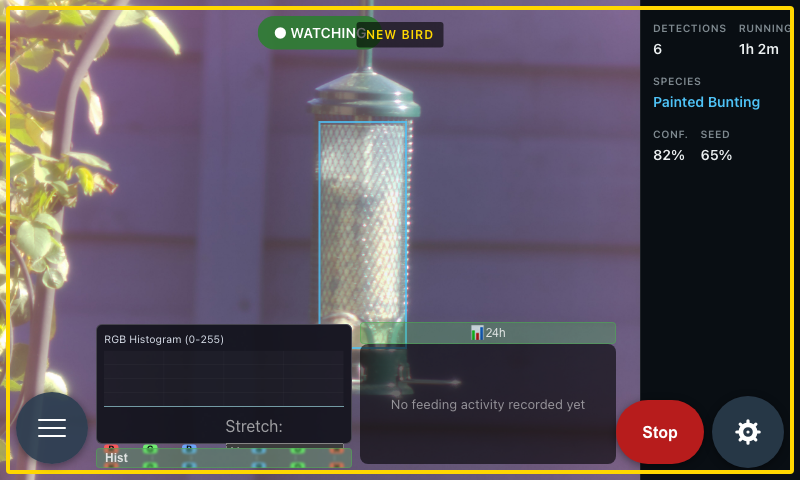
 Bird Watcher active state — latest detection shown with seed level and system status
How to use it
- Navigate to the Bird Watcher view (bird icon in the toolbar)
- Click Take Preview Photo to frame your feeder
- Click Draw ROI and drag a box over the seed tube to enable seed level tracking
- Adjust the confidence threshold and cooldown if needed (defaults work well for most setups)
- Click Start Bird Watcher — the indicator turns ● WATCHING and captures begin automatically
All captures save to ~/photos/bird_captures/ as full-resolution JPEG + RAW DNG pairs.
Bird Rarity Alerts
New: When an unusual visitor lands, a full-screen outline flashes to get your attention.
| Alert | Color | Meaning |
|---|---|---|
| New Bird | Gold | Species not seen in the last N days (default: 30) |
| Rare Bird | Silver | Species with fewer than N total sightings (default: 5) |
 |  |
| Left: gold outline for a new species. Right: silver outline for a rare visitor. |
The outline flashes 3 times, then pulses slowly, and auto-dismisses after 30 seconds. Configure the thresholds in the Bird Watcher settings panel ("New Bird Window" and "Rare Bird Threshold").
The system tracks every sighting in ~/pipiece-ui/config/bird-species-summary.json and ~/pipiece-ui/config/bird-watcher-sightings.json so rarity is determined accurately across restarts.
Daily Bird Reports
New: PiPiece can generate a markdown daily sightings report at nautical sunset while Bird Watcher is running.
Reports are written to:
~/photos/reports/YYYY-MM-DD.md
Each report includes:
- Total sightings and per-species counts
- New and rare highlights
- Sample images for known birds and unknown detections
- Weather summary and top activity windows
- Links back to the day folder in Photos
You can read reports in the in-app Reports view, which uses the same markdown renderer as the documentation view.
Backfill missing days:
cd ~/pipiece-ui
npm run reports:backfill -- --from 2026-04-01 --to 2026-04-19 --dry-run
npm run reports:backfill -- --from 2026-04-01 --to 2026-04-19

# or run the script directly
node scripts/backfill_bird_reports.mjs --from 2026-04-01 --to 2026-04-19 --dry-run
node scripts/backfill_bird_reports.mjs --from 2026-04-01 --to 2026-04-19

# if your API is on a non-default host/port
node scripts/backfill_bird_reports.mjs --base-url http://127.0.0.1:80 --from 2026-04-01 --to 2026-04-19
Overwrite existing report files when needed:
node scripts/backfill_bird_reports.mjs --from 2026-04-01 --to 2026-04-19 --overwriteHow it works
- A background Python process runs a 320×320 EfficientDet-Lite0 object detection model at ~5–6 fps using the existing camera low-resolution stream
- When a bird (COCO class
bird) is detected above the confidence threshold, the system captures a full-resolution 4056×3040 JPEG + RAW DNG still from the high-resolution stream New: An optional EfficientNetB0 species classifier identifies the bird and names the file after the species (e.g.
american_robin_20260326_143022.jpg). When no model is present, files are saved asunknown_*. Train your own model withscripts/train_bird_classifier.py.- The Express.js server watches for new captures and pushes a
bird_detectionSSE event to the Vue UI, which displays the latest photo in real time New: The server tracks detection timestamps and exposes a
/api/bird-watcher/activityendpoint for hourly feeding rate data. The Vue UI overlays a toggleable feeding activity graph on the image with localStorage persistence.New: The server runs a
determineBirdRarity()function on every detection, attaches ararityfield to the SSE event ('new','rare', or'common'), and persists sighting history to disk. The Vue UI renders a gold or silver outline alert for new and rare species.- A visual seed level estimator analyzes a user-defined ROI on the transparent tube feeder using HSV color masking, reporting fill percentage with yellow/red warnings
- All captures are saved to
~/photos/bird_captures/and accessible through the Photos view
Overview
PiPiece combines a powerful Express.js REST API backend with a modern Vue.js touchscreen interface to provide comprehensive control over the Raspberry Pi HQ Camera. The system is optimized for use with the PiPiece 3D printed case and HyperPixel4 display, creating a portable, self-contained imaging platform.
Originally designed for astrophotography, PiPiece has evolved into a general-purpose AI camera platform — including on-device bird detection and photography at a feeder using the LiteRT inference runtime.
Key Features
- 🐦 Bird Watcher: AI-powered automatic bird detection, species classification, and photography using EfficientDet-Lite0 + EfficientNetB0, with hourly feeding activity graph and rarity alerts
- 📷 Full Camera Control: Exposure time, gain, white balance (red/blue gains)
- 🖥️ Touchscreen Interface: Optimized for 4" HyperPixel4 display
- 🔄 Live Preview: Continuous capture mode with auto-refresh
- ⏱️ Timelapse Support: Automated sequential imaging
- 🌐 RESTful API: Complete camera and system control via HTTP
- 📊 Server-Sent Events: Real-time status updates
- 📖 Interactive Documentation: Built-in Swagger UI API explorer
- ⚙️ System Management: Remote restart, shutdown, and updates
Architecture
┌─────────────────────────────────────────┐
│         Vue.js Web Interface            │
│  (Touchscreen-optimized for HyperPixel) │
└─────────────┬───────────────────────────┘
              │ HTTP/REST API
┌─────────────▼───────────────────────────┐
│          Express.js Server              │
│          (Port 80)                      │
└─────────────┬───────────────────────────┘
              │ rpicam-* commands
┌─────────────▼───────────────────────────┐
│      Raspberry Pi HQ Camera             │
│       (12.3 MP, CS/C Mount)             │
└─────────────────────────────────────────┘
PiPiece on Telescope
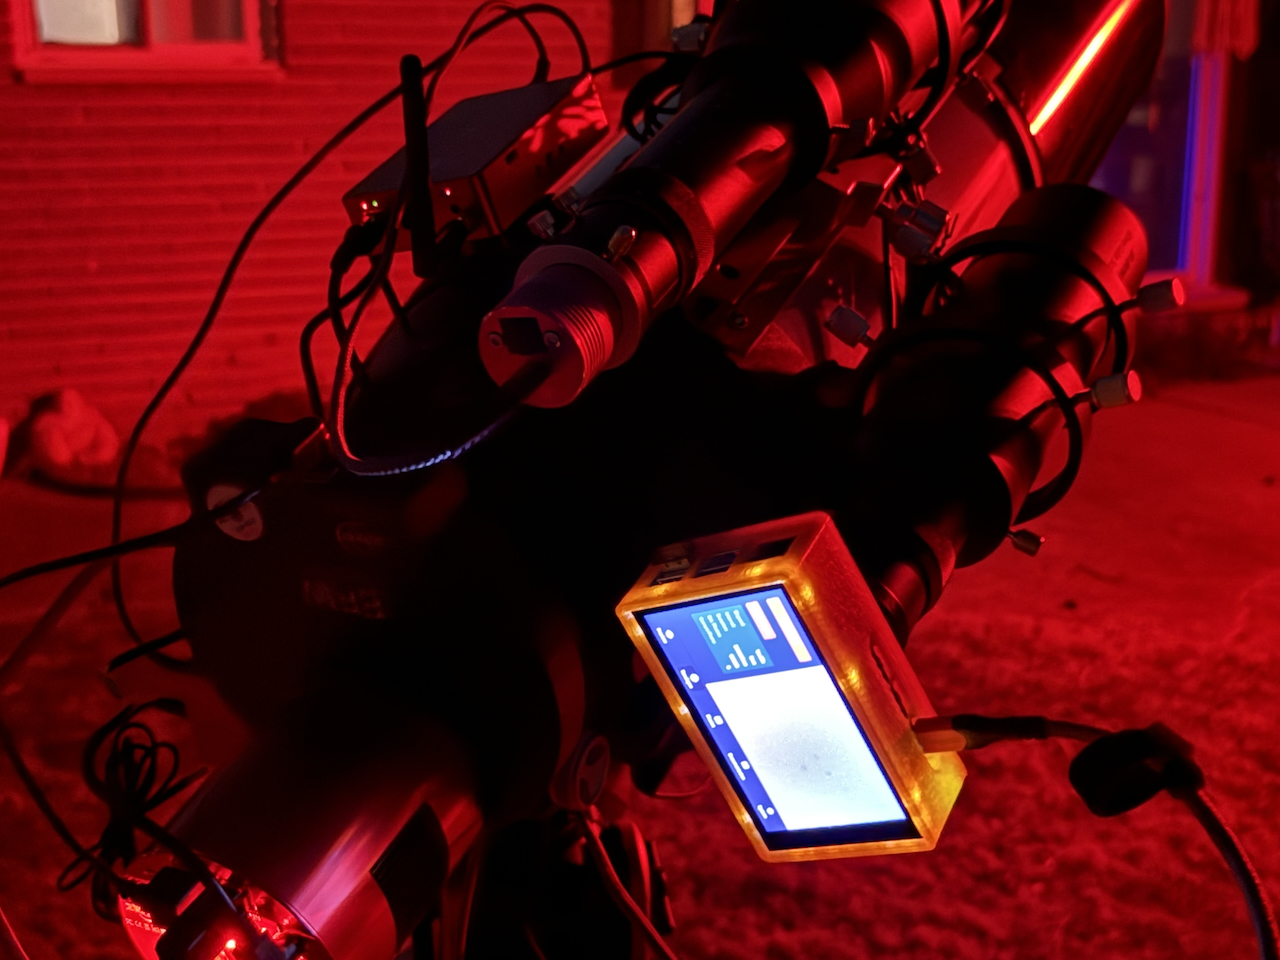 PiPiece mounted to a 60mm guidescope riding the rest of my telescope setup
Hardware Requirements
- Raspberry Pi 5 (tested) or newer
- Raspberry Pi HQ Camera (12.3 megapixel, C/CS mount)
- HyperPixel4 touchscreen display (optional but recommended)
- PiPiece Case - 3D printable design available at gitlab.com/johnwebbcole/pipiece
- SD Card (16GB minimum, 32GB+ recommended)
- Power Supply (official Raspberry Pi power supply recommended)
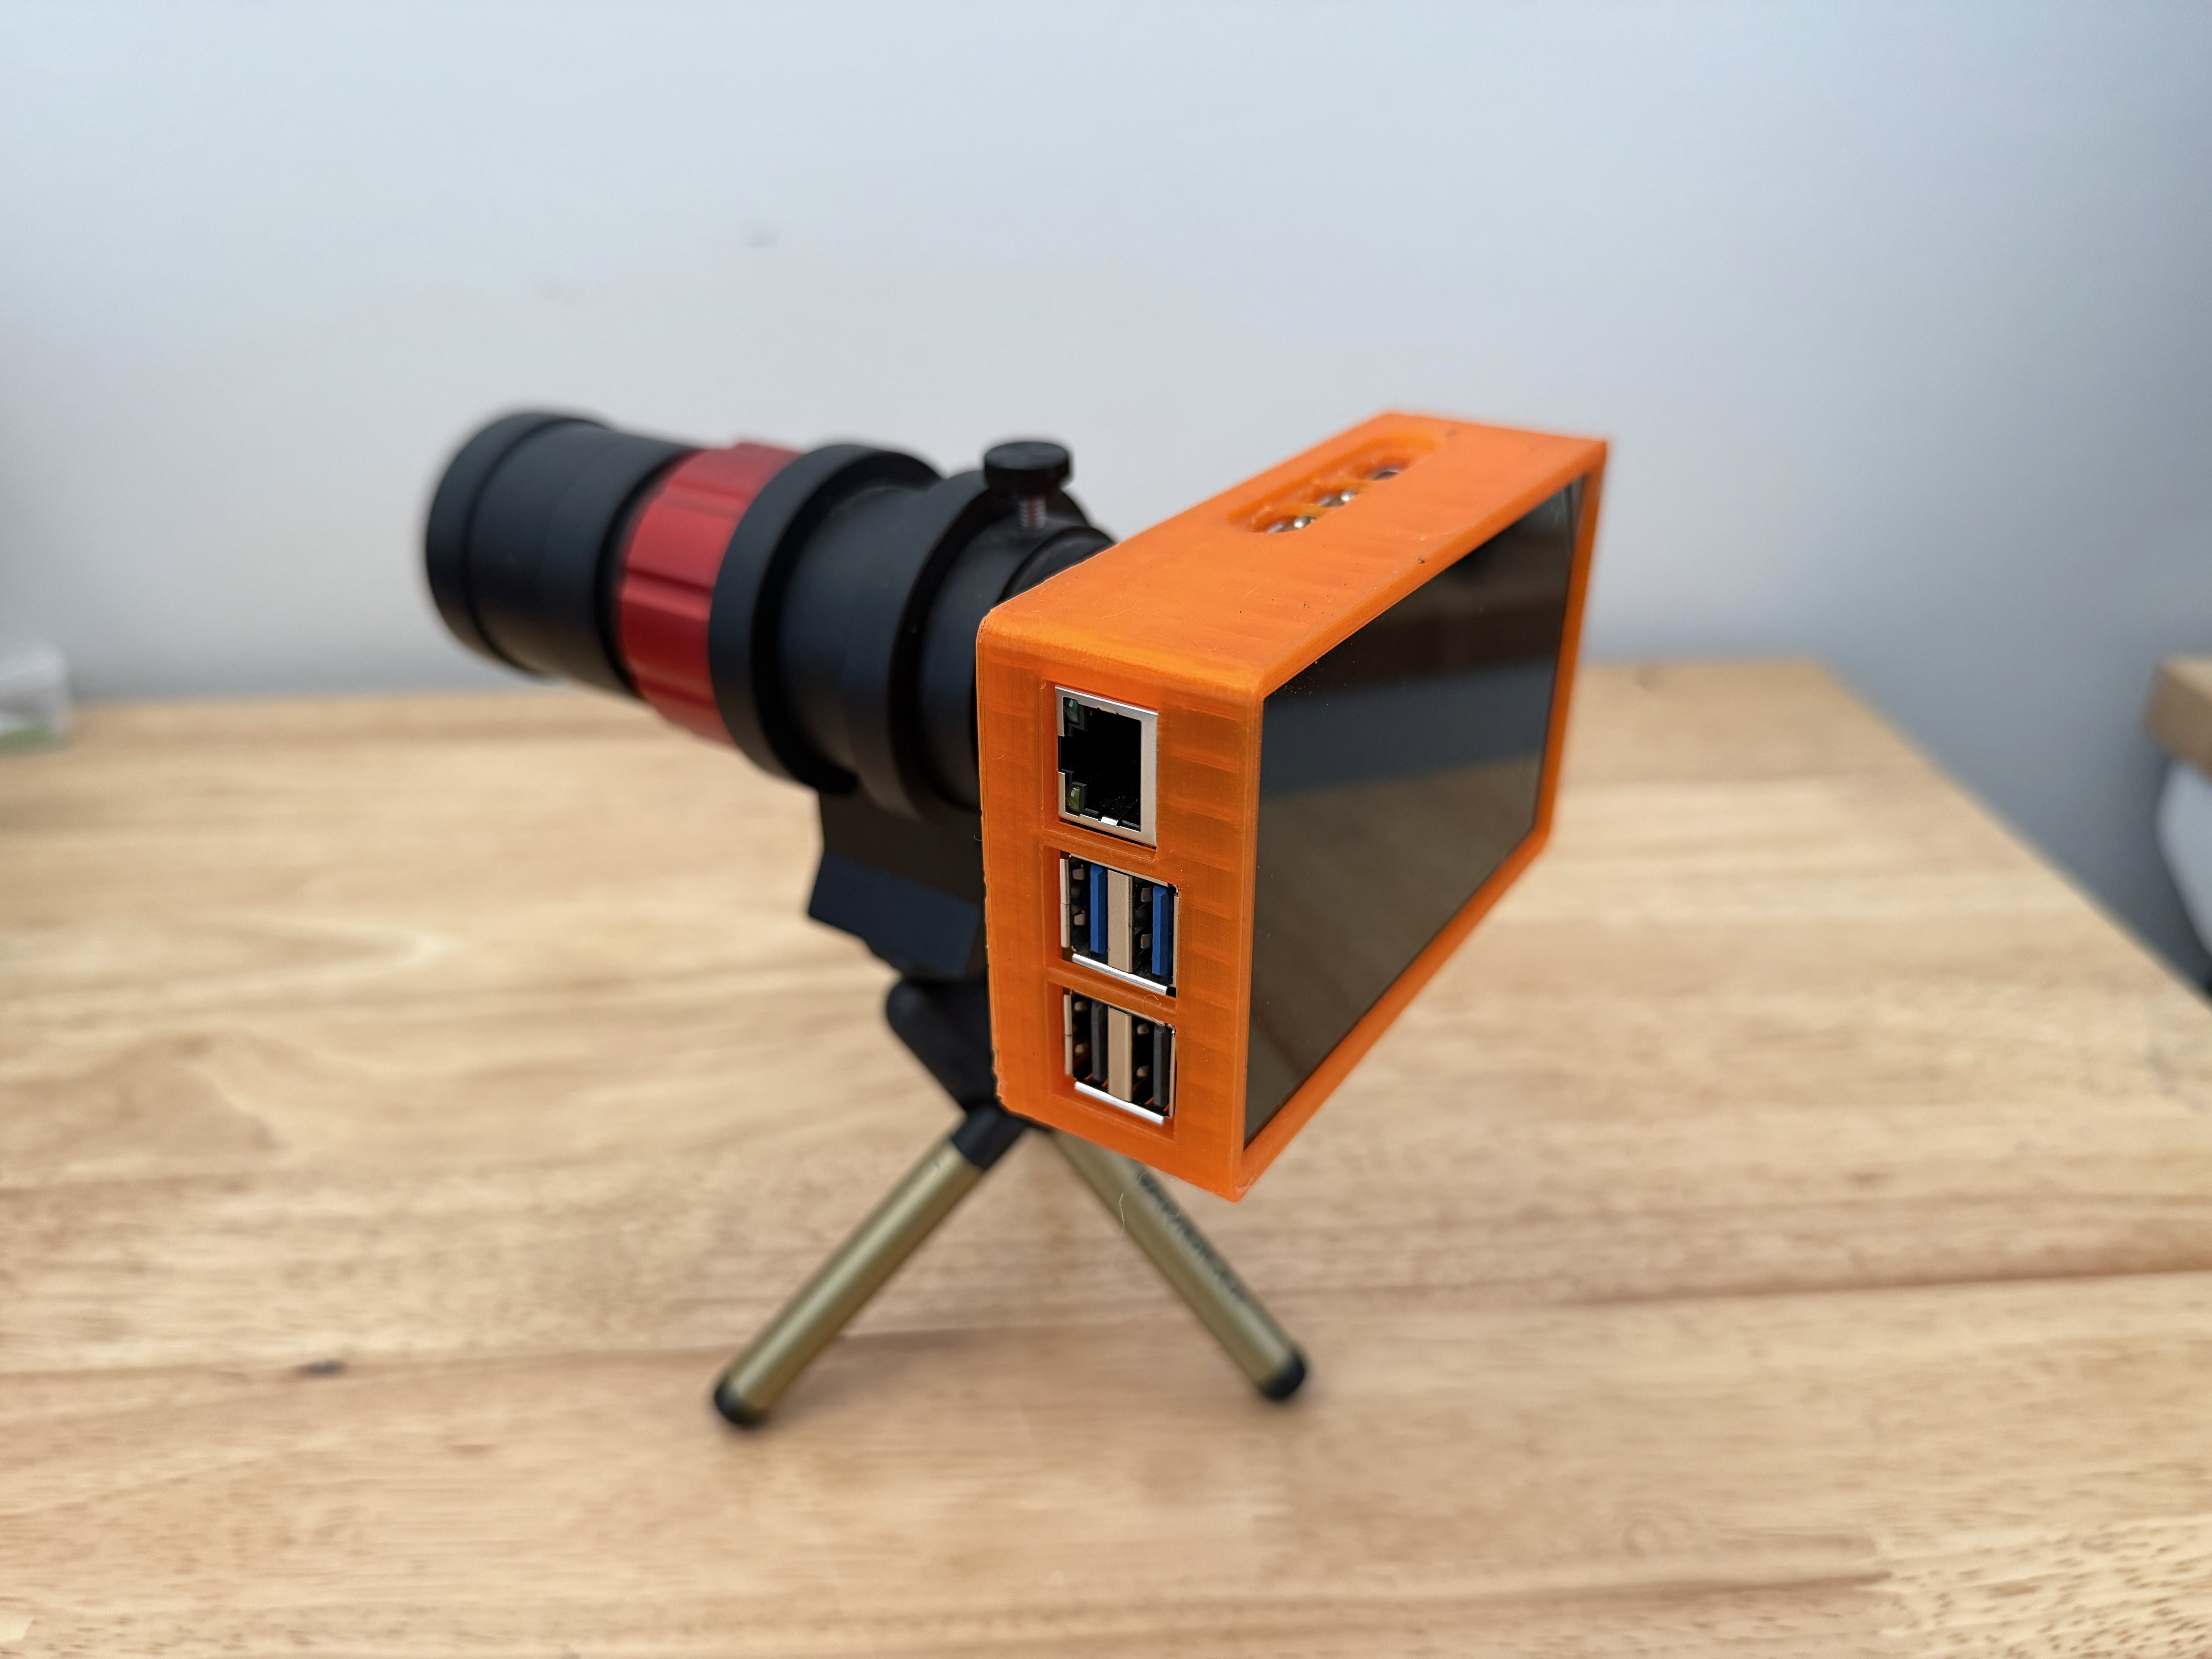 3D printed PiPiece case with HyperPixel4 display
Software Components
Backend - Express.js API Server
Located in /server, the API provides:
Camera API (
/api/camera/*)- Single photo capture with configurable settings
- Long exposure support
- Timelapse sequences
- MJPEG video streaming for focus/preview
- Camera status monitoring
System API (
/api/system/*)- System status and uptime
- Remote restart and shutdown
- Package updates with streaming output
Events API (
/api/events)- Server-sent events for real-time status
- Camera and system state monitoring
See server/README.md for API details.
Frontend - Vue.js UI
Located in /ui, the interface provides:
Preview View: Live camera control with adjustable settings
- Gain, exposure time, red/blue white balance gains
- Continuous capture mode
- Interactive settings sidebar
Focus View: MJPEG video stream for precise focusing
Capture View: Single image capture with preview
Timelapse View: Automated sequential imaging
System View: Device management and status
See ui/README.md for development details.
Quick Start
1. Hardware Setup
- Assemble your Raspberry Pi with HQ Camera and optional HyperPixel4 display
- Install Raspberry Pi OS (64-bit recommended)
- Optionally, 3D print and assemble the PiPiece case
2. System Configuration
Follow the comprehensive setup guide in setup.md which covers:
- Enabling the camera interface
- Installing Node.js 24
- Configuring PM2 process manager
- Setting up the HyperPixel4 display
- Configuring autostart and kiosk mode
Optional: Configure Chromium Kiosk Mode Autostart
To launch the PiPiece interface automatically on boot in fullscreen kiosk mode:
# Create the labwc config directory if it doesn't exist
mkdir -p ~/.config/labwc

# Copy the autostart configuration
cat config_labwc_autostart.sh > ~/.config/labwc/autostart

# Or manually edit the file
nano ~/.config/labwc/autostart
Add the following content to ~/.config/labwc/autostart:
chromium http://localhost --kiosk --noerrdialogs --disable-infobars --no-first-run --enable-features=OverlayScrollbar --start-maximized --force-dark-mode --enable-features=WebContentsForceDark --remote-debugging-port=9222 --remote-debugging-address=0.0.0.0 --force-devtools-available &This configuration:
- Opens Chromium in kiosk mode (fullscreen, no browser UI)
- Points to the local PiPiece server (localhost)
- Enables dark mode for OLED display optimization
- Enables remote debugging for development
- Disables error dialogs and info bars
After configuration, reboot to test:
sudo reboot3. Quick Installation
# Clone or copy the project to your Pi
cd ~/src
# Assuming project is in ~/src/pipiece-ui

# Install and start the server
cd ~/src/pipiece-ui/server
npm ci
pm2 start bin/www.js --name "pipiece-ui"
pm2 restart pipiece-ui --watch
pm2 save
pm2 startup systemd  # Follow the instructions

# Build the UI (on development machine)
cd ~/src/pipiece-ui/ui
npm ci
npm run build

# Copy ui/dist/* to the Pi at ~/src/pipiece-ui/ui/dist/
4. Access the Interface
- Touchscreen: The UI will auto-launch in Chromium kiosk mode
- Web Browser: Navigate to
http://pipiece.localorhttp://<pi-ip> - API Docs: Visit
http://pipiece.local/api-docs
Usage
Basic Image Capture
- Navigate to the Preview view
- Adjust camera settings:
- Gain: Analog gain multiplier (higher = brighter)
- Exposure: Shutter time in milliseconds
- Red/Blue Gain: Manual white balance adjustment
- Click Capture to take a photo
- Enable Repeat for continuous capture
Focusing
- Navigate to the Focus view
- Point the camera at your target
- Adjust focus ring while watching the live MJPEG stream
- Use the zoom features to fine-tune
Timelapse
- Navigate to the Timelapse view
- Set interval and duration
- Start the sequence
- Monitor progress and stop when needed
API Access
# Capture an image
curl -X POST http://pipiece.local/api/camera/capture \
  -H "Content-Type: application/json" \
  -d '{"gain": 1.5, "exposure": 1000, "redGain": 2.0, "blueGain": 1.8}'

# Get system status
curl http://pipiece.local/api/system/status

# Stream real-time updates
curl http://pipiece.local/api/events
Project Goals
AI-Assisted Development
PiPiece is developed with AI coding assistants as a primary workflow, exploring how far they can take a full-stack hardware project. The Bird Watcher feature in particular was an interesting case study.
The Bird Watcher was first attempted with ChatGPT (GPT-4.5). The experience was frustrating: it repeatedly added Express.js route code that failed to compile, then "fixed" the errors by simply deleting the non-working code until it compiled again — leaving incomplete, non-functional routes. After several iterations the feature still didn't work.
Claude (claude-sonnet-4.6) completed the entire feature in a single session. Here's a sample of the back-and-forth that led to a working implementation:
"It's been running and I've seen birds land on the feeder but no pictures were taken."
Claude diagnosed the root cause from PM2 logs alone:
[bird-watcher] [diag] top_detection=tennis racket(0.586), captures=0
[bird-watcher] [diag] top_detection=clock(0.586), captures=0
[bird-watcher] [diag] top_detection=clock(0.609), captures=0
"The diagnostics tell the whole story. The COCO SSD MobileNet V1 (2018, quantized) model is too weak for this scene — it sees 'clock' and 'tennis racket' from the feeder shape, and never detects 'bird' at all, even with birds present. The fix is to switch to EfficientDet-Lite0."
After switching models, a working download URL was needed — the TF Hub link returned HTTP 403. Claude searched the web, found the correct MediaPipe model URL, and patched the download in the same turn.
Other challenges Claude solved autonomously:
- Identifying that
setPointerCapturewas called on the wrong DOM element, causing the ROI drag to drop after 20px - Constructing the correct image URL from the
/api/camera/autoresponse fields (the endpoint doesn't returnimageUrl) - Broadening the HSV seed color range when seed level was reporting 15% for an 85%-full feeder
- Adding
touch-action: noneso iOS/Android touch events don't cancel pointer capture during ROI drawing
Learning Objective
This project serves as a practical exploration of AI-assisted full-stack development, including:
- RESTful API design and implementation with Express.js
- Modern frontend development with Vue.js and Server-Sent Events
- Hardware interfacing with the Raspberry Pi HQ Camera
- On-device machine learning with LiteRT (Google AI Edge)
- Process management and system automation
Future Development
The ultimate goal is to enable live viewing and capture of faint astronomical objects from a telescope, including advanced image stacking, plate solving, and deep-sky object cataloging.
Development
Start Dev Workspace (tmux)
Use the root start-dev.sh script to launch all primary development processes in a tmux tiled pane grid.
Prerequisites:
tmux- UI dependencies installed with
cd ui && npm install
Run from the project root:
./start-dev.shThe script starts these commands:
- In
ui/:./node_modules/.bin/nodemon -w ./src -w ./public --exec "npm run build" -e js,vue,md - In root:
./sync.sh - In
ui/:npm run storybook - In
ui/:npm run preview - In root:
npm run docs:dev
The script recreates the pipiece-dev tmux session on each run so the pane grid is always reset to the expected layout.
Project Structure
pipiece/
├── docs/                              # Project docs and images
├── e2e/                               # Root-level e2e artifacts
├── server/                            # Express.js REST API
│   ├── bin/                           # Server startup script
│   ├── config/                        # Environment and runtime config
│   ├── routes/                        # API route handlers
│   │   └── api/                       # Camera/system/events/file endpoints
│   ├── public/                        # Static files served by Express
│   └── package.json
├── setup/                             # Pi provisioning and helper scripts
├── ui/                                # Vue.js frontend workspace
│   ├── .storybook/                    # Storybook configuration
│   ├── e2e/                           # Playwright UI tests
│   ├── scripts/                       # Utility scripts (manifest generation)
│   ├── src/
│   │   ├── components/                # Reusable Vue components
│   │   ├── views/                     # Application views
│   │   ├── router/                    # Vue Router configuration
│   │   ├── stories/                   # Storybook assets/docs
│   │   └── utils/                     # FITS helpers and tests
│   ├── vitest-browser/                # Browser-mode component tests
│   ├── vitest.browser.config.js
│   ├── vitest.storybook.config.js
│   └── package.json
├── package.json                       # Root docs scripts (vitepress)
├── start-dev.sh                       # tmux dev workspace launcher
├── sync.sh                            # File sync script for development
├── setup.md                           # Comprehensive setup guide
├── config_labwc_autostart.sh          # Chromium kiosk mode autostart config
└── hyperpixel-rotate.sh               # Display rotation utility
Development Workflow
For active development on a local machine with live testing on the Raspberry Pi, use the following workflow:
Automatic File Sync to Raspberry Pi
The sync.sh script uses fswatch and rsync to automatically sync local changes to the Pi:
# Install fswatch (macOS)
brew install fswatch

# Make sync script executable
chmod +x sync.sh

# Edit sync.sh to match your Pi's hostname or IP
# Default uses 'pipiece' as hostname

# Start continuous sync
./sync.sh
The script will:
- Monitor the project directory for changes
- Automatically sync files to the Pi (excluding
node_modules) - Keep your Pi updated in real-time during development
Note: Ensure SSH key-based authentication is set up for passwordless rsync:
# Generate SSH key if you don't have one
ssh-keygen -t ed25519

# Copy to your Pi
ssh-copy-id pi@pipiece
Configure SSH for Remote Debugging
To enable remote debugging of the Chromium interface running on the Pi, configure SSH port forwarding:
# Edit your SSH config
nano ~/.ssh/config
Add the following configuration:
Host pipiece
  HostName pipiece.localdomain
  User pi
  IdentityFile ~/.ssh/id_rsa
  LocalForward 9222 localhost:9222
This configuration:
- Creates an SSH alias
pipiecefor easy connection - Forwards port 9222 from the Pi to your local machine
- Enables Chrome DevTools remote debugging
Using Remote Debugging:
Connect to your Pi with port forwarding:
bashssh pipieceOpen Chrome on your development machine and navigate to:
chrome://inspectClick "Configure" and add
localhost:9222if not already listedYour Pi's Chromium instance will appear under "Remote Target"
Click "inspect" to open DevTools and debug the running interface
This is particularly useful for:
- Debugging touch interactions on the HyperPixel display
- Testing responsive layouts
- Monitoring console logs and network requests
- Profiling performance on the Pi hardware
Auto-Rebuild Vue.js UI
For continuous UI development, use nodemon to automatically rebuild when files change:
cd ui

# Install UI dependencies if not already installed
npm install

# Watch for changes and rebuild automatically
./node_modules/.bin/nodemon -w ./src -w ./public --exec "npm run build" -e js,vue,md
This command:
- Watches all files in
./srcand./publicdirectories - Triggers
npm run buildon any.js,.vue, or.mdfile change - Combined with
sync.sh, changes are automatically built and synced to the Pi
Complete Development Setup
Open three terminal windows:
Terminal 1 - File Sync:
./sync.shTerminal 2 - Auto-Build UI:
cd ui
nodemon -w ./src -w ./public --exec "npm run build" -e js,vue,md
Terminal 3 - Monitor Pi Server:
ssh pi@pipiece
pm2 logs pipiece-ui
With this setup:
- Edit files locally in your IDE
- UI rebuilds automatically on save
- Changes sync to the Pi instantly
- Refresh browser to see updates (or use the auto-reload script on the Pi)
Alternative: Local Development Server
For UI-only development without the Pi:
cd ui
npm run dev
This runs Vite's dev server with hot-reload. You'll need to proxy API requests to your Pi or mock the API endpoints.
Contributing
This is a learning project, but contributions, suggestions, and feedback are welcome!
- Fork the repository
- Create a feature branch
- Make your changes
- Submit a pull request
Troubleshooting
Camera Issues
# Test camera
rpicam-hello

# Check for stuck processes
ps aux | grep rpicam
kill <PID>

# Enable camera in raspi-config
sudo raspi-config
Server Issues
# Check PM2 logs
pm2 logs pipiece-ui

# Restart server
pm2 restart pipiece-ui

# Check port availability
sudo lsof -i :80
Display Issues
# Check display configuration
grep dtoverlay /boot/firmware/config.txt

# Rotate display
./hyperpixel-rotate.sh
See setup.md for detailed troubleshooting.
Screenshots
All screenshots are generated from the Playwright E2E test suite (ui/e2e/views.spec.js) at 800×480 (HyperPixel4 resolution) and kept in sync automatically.
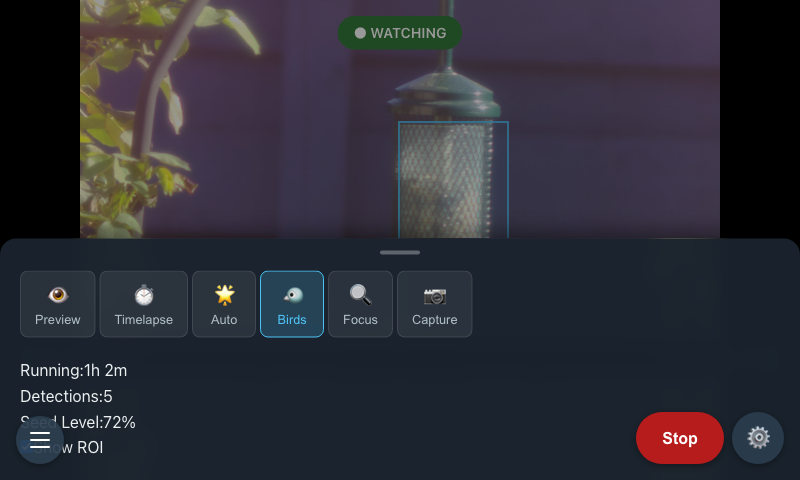
Bird Watcher
Bird Watcher active state — live detection with seed level and elapsed time
Bird Rarity Alerts
| |
| Gold outline for a new species (left); silver outline for a rare visitor (right) |
Preview Interface
Camera control interface with live preview and settings
Timelapse Interface
 Timelapse controls with live image updates
Photos Interface
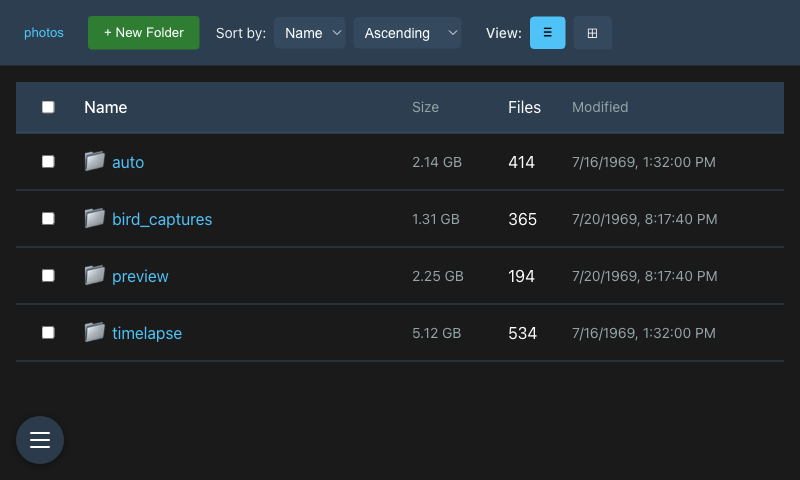 Photo browser with thumbnail and list views
API Documentation
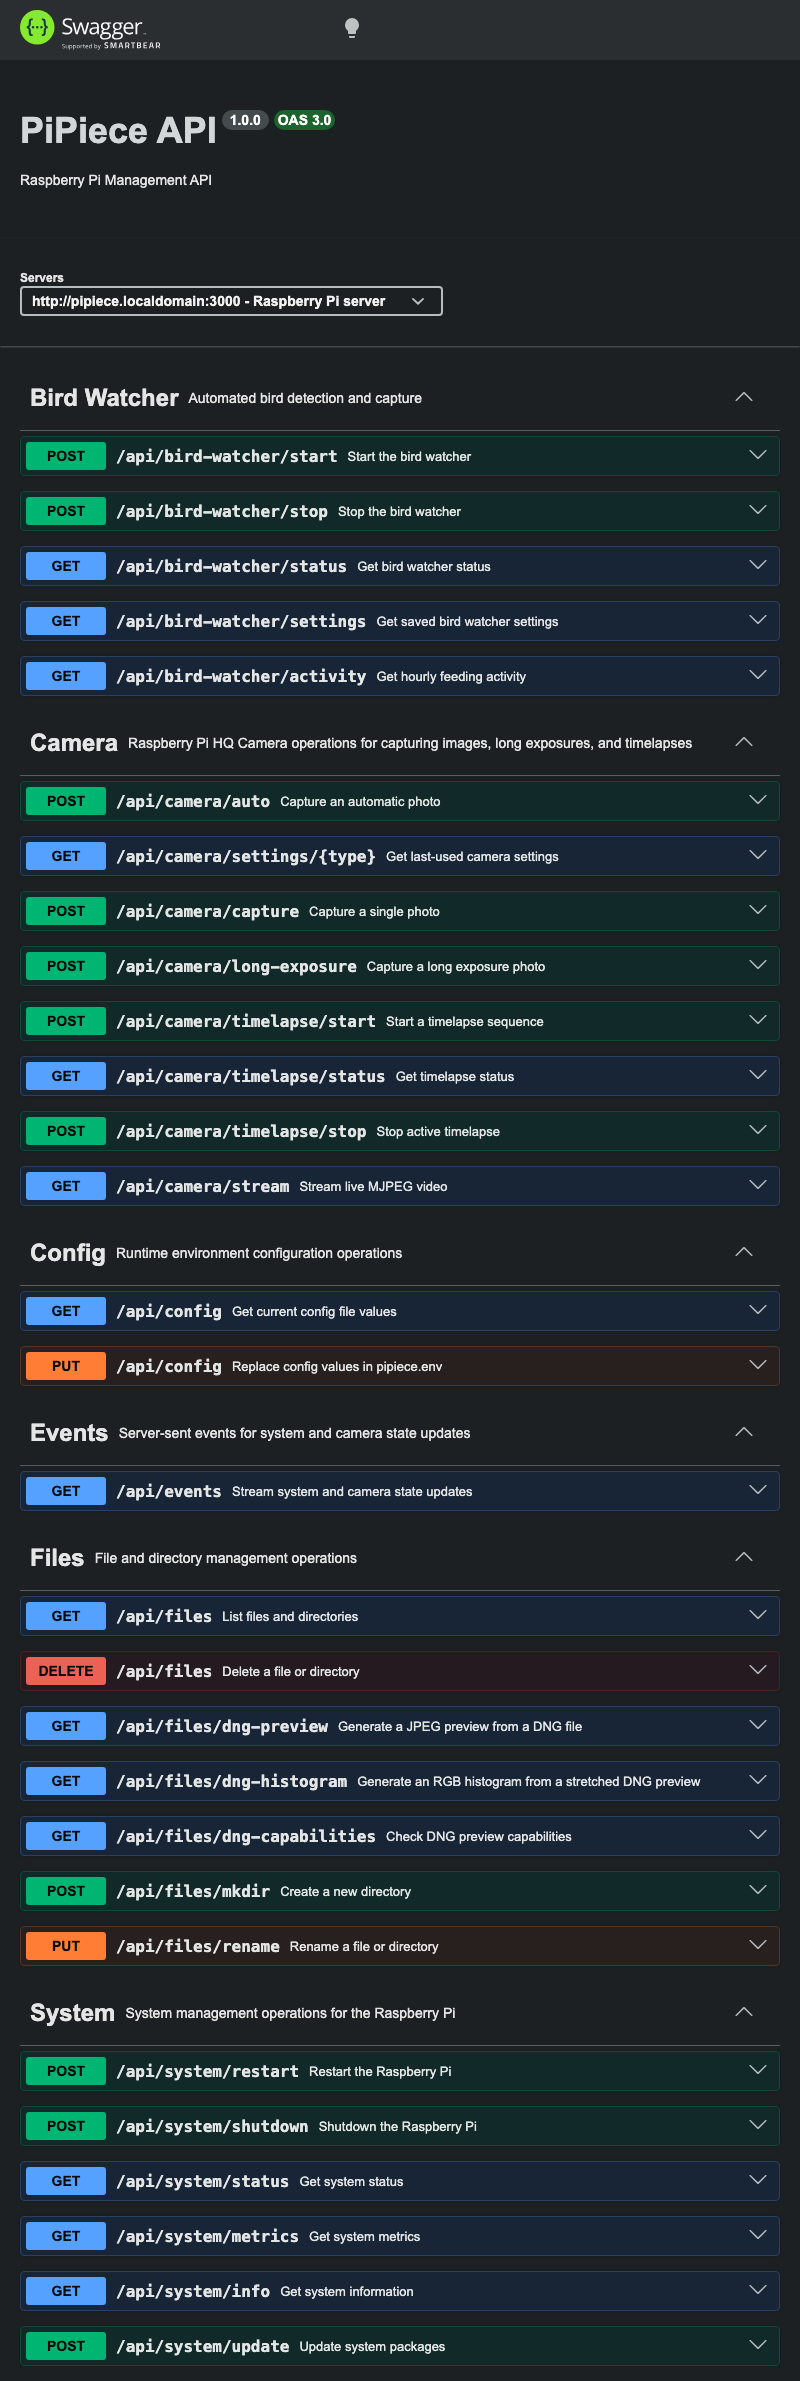 Interactive API documentation with Swagger UI
System Management
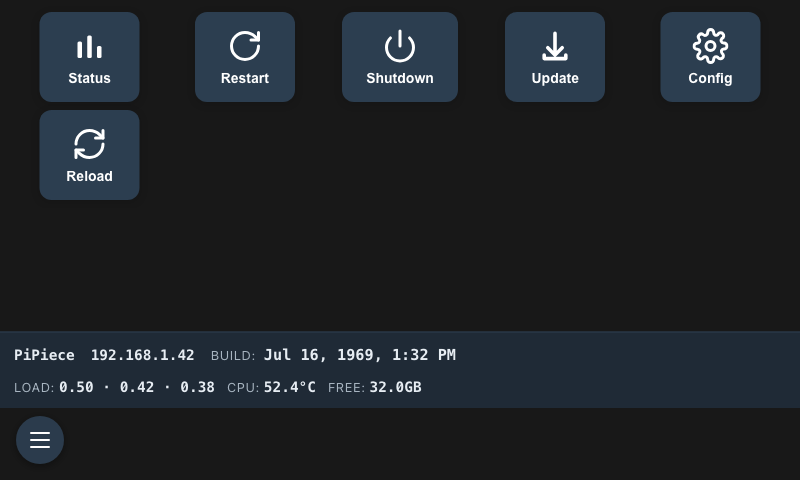 System status and management interface
New: The System Controls view now displays a combined Status & Weather panel showing hostname, IP, version, uptime, load average, CPU temperature, and free disk space alongside live weather data — no Status button click needed.
System Monitor
New: A live System Monitor view (
/system/monitor) provides a btop-style dashboard without leaving the browser.
Access it via the Monitor button on the System Controls page.
Panels:
- CPU — per-core usage history sparklines (last 60 samples, area charts) with live CPU%
- Memory — segmented bar showing used / cached / buffers / free; total and available displayed below
- Network — download (↓ green) and upload (↑ amber) rate sparklines per interface, with live KB/s or MB/s readout
- Disks — per-mount usage bars with warning/critical colour coding at 80%/95%
- Processes — top 50 processes sorted by CPU%, showing PID, name, CPU%, memory, and state
Data sources: CPU, memory, and network metrics are pushed via the existing SSE stream every 2 s (extended status event). The process list polls GET /api/system/monitor/processes every 3 s using ps. All data is read directly from /proc — no Python script or additional daemons required.
Layout: Two-column grid on screens wider than 600 px; single-column on the HyperPixel4 (480 px portrait). SVG graphs use no external charting libraries.
Package Updates (apt-soak)
New: A Package Updates view (
/system/apt-soak) shows the status of the apt-soak upgrade queue — which packages are soaking, which are ready to install, and what was recently updated.
Access it via the Packages button on the System Controls page.
Sections:
- Pending — packages currently tracked by apt-soak, each showing version, soak badge (Soaking · Nh left or Ready), and a reboot indicator if a reboot is required to apply the change
- Recent History — last 20 apt transactions from
/var/log/apt/history.log, grouped by date; packages that require a reboot are flagged inline
Reboot banner: when /var/run/reboot-required.pkgs is non-empty a dismissible banner appears at the top of the view.
Data sources:
- Pending queue:
/var/lib/apt/soak-upgrade-tracking(written byapt-soak-upgrade) - Reboot state:
/var/run/reboot-required.pkgs - History:
/var/log/apt/history.log - Soak period:
SOAK_HOURSenv var (default 48)
License
This project is developed for educational purposes. See individual component licenses for details.
Acknowledgments
- HyperPixel4: Display by Pimoroni
- Raspberry Pi Foundation: For the amazing platform and camera module
- Vue.js & Express.js Communities: For excellent frameworks and documentation
- Microsoft Copilot: For initial AI-assisted development support
- Anthropic Claude: For building the Bird Watcher feature — from Python/LiteRT inference pipeline to Express.js routes, SSE integration, and Vue UI, all working on the first real-world test
Related Projects
- PiPiece Case Design - 3D printable enclosure
- Raspberry Pi HQ Camera - Official camera module
- HyperPixel4 - Touchscreen display
Status: Active Development | Version: 0.1.0 | Last Updated: March 2026