Astro Live Stacking
An electronic eyepiece for your telescope. Point PiPiece at a deep-sky object, press Start, and watch the image build itself — every exposure is plate-solved, aligned onto the first frame, and folded into a running stack you see live on screen.
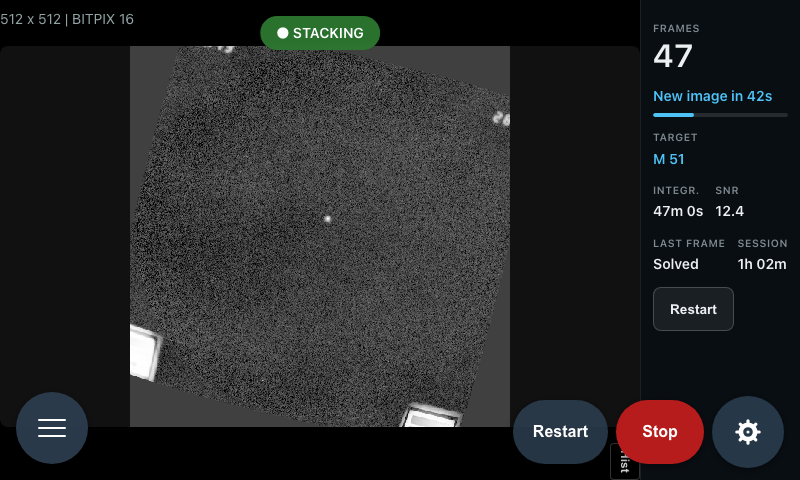
This is the feature PiPiece was originally built for. Nothing is uploaded anywhere: solving, aligning and stacking all happen on the Pi.
Before You Start
Live stacking needs two things installed on the Pi beyond the normal PiPiece setup:
bash setup/astro-venv.sh    # astropy + numpy in ~/astro_venv
bash setup/astrometry.sh    # astrometry.net solve-field + index files
The first one is required — Start returns an error until ~/astro_venv exists. The second is what actually identifies where the telescope is pointing; without it every frame reports Solve failed and nothing accumulates.
Using It
1. Focus first
Switch to the Focus mode and get the stars as tight as you can. Live stacking cannot rescue a soft focus — it averages whatever it is given, and a bloated star stays a bloated star through a hundred frames.
2. Open the Stack mode
In the camera view, pick the 🔭 Stack tab.
3. Set gain and exposure
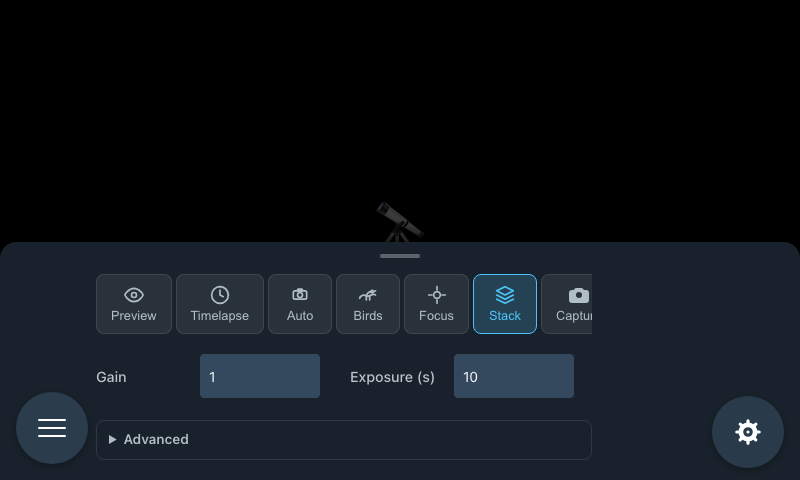
Two knobs sit in the primary row, and for most targets they are the only two you touch:
| Setting | Default | What it does |
|---|---|---|
| Gain | 1 | Analogue sensor gain, 1–16. Higher pulls faint signal out of a short sub, at the cost of noise. |
| Exposure (s) | 10 | Length of each subframe, 0.1–300 s. Longer subs go deeper; how long you can go depends on your tracking. |
Everything else lives behind Advanced:
| Setting | Default | What it does |
|---|---|---|
| Binning | 1×1 | Software block-averaging, 1×1 / 2×2 / 4×4. Binning trades resolution for signal-to-noise and a faster solve. |
| Stacking | Mean | Mean (the safe default), Sum, or Sigma-clipped (rejects outliers — satellites, cosmic ray hits, a passing plane). |
| Keep subframes | Off | Also archive every solved sub as its own FITS file, for re-processing later. See Keeping your subframes. |
| Focal length (mm) | 0 | Your telescope's focal length. 0 means "unknown" — see Optics and the plate solver. |
| Aperture (mm) | 0 | Recorded for reference; it does not affect the solve. |
| Pixel size (µm) | 1.55 | Sensor pixel pitch. The default is the Pi HQ Camera (IMX477), so HQ users can leave it alone. |
4. Press Start
The preview stream is released, the camera is handed to the stacking worker, and the image area switches from the MJPEG preview to a live FITS viewer. A green ● STACKING badge appears over the image.
The first frame takes the longest — with no idea where the telescope is pointing, the solver scans its whole index. Once one frame solves, its coordinates seed the next one and subsequent solves are quick.
Reading the HUD
The status panel beside the image — the sidebar in the screenshot above — shows the session as it builds:
- Frames — the headline number, climbing by one per successfully stacked sub
- New image in n s — a per-exposure countdown with a progress bar, so the view never looks frozen between subs. It reads Solving… while the frame is being plate-solved
- Target — the catalog object nearest the solved center, e.g.
M 51. Blank until the first successful solve - Integr. — total integration time accumulated so far
- SNR — a signal-to-noise estimate for the current stack
- Last frame —
Solved,Solve failed, orDiscarded. Anything butSolvedshows in amber - Session — wall-clock time since you pressed Start
The image itself is auto-stretched on every update — a linked screen transfer function that lifts faint nebulosity without blowing out the star field. There is no slider to fiddle with mid-session, deliberately. (The full stretch controls are available later, in the FITS Viewer.)
Stop and Restart
Two actions end or reset a session, and they do very different things:
- Stop — ends the session, releases the camera, and saves the finished stack to disk.
- Restart — keeps the camera and the session alive, saves the stack built so far, then begins a fresh accumulation: new reference frame, frame count back to zero. This is how you move to the next target without paying the camera warm-up again.
Restart appears both in the toolbar and on the HUD itself.
Nothing is lost either way — both paths persist the current stack before resetting.
Where Your Files Land
Everything is rooted at your photos directory ($PHOTOS_DIR, ~/photos by default).
Finished stacks go to astro/<target>/<YYYYMMDD>/, as a FITS file plus a matching auto-stretched PNG preview:
astro/M 51/20260725/Stack_M 51_47x60.0s_20260725-034218.fits
astro/M 51/20260725/Stack_M 51_47x60.0s_20260725-034218.png
The name carries the frame count and the sub length — 47x60.0s is 47 minutes of integration.
Subframes (when Keep subframes is on) go to light/<target>/:
light/M 51/Light_M 51_60.0s_Bin1_20260725-033942_0001.fits
light/M 51/Light_M 51_60.0s_Bin1_20260725-033942_0002.fits
A frame that never solved is filed under the target Unknown.
Browsing Finished Stacks
Open Reports and pick the Astro tab. It lists every session grouped by target, then by date, newest night first — PNG thumbnails you can tap to open the full FITS in the viewer, with zoom, pan, a per-channel histogram and manual stretch controls.
The Astro tab only appears once you actually have astrophotos. A PiPiece that has never stacked anything shows Reports exactly as before.
Keeping Your Subframes
Turning on Keep subframes costs disk space (each sub is a full-resolution FITS) but buys you the option of re-processing the night properly later.
The filenames follow the convention dedicated astro cameras produce, so Siril, DeepSkyStacker and PixInsight all group a session correctly on import:
Light_<target>_<exposure>s_Bin<n>_<YYYYMMDD-HHMMSS>_<seq>.fitsThere is no filter field because PiPiece has no filter wheel. Copy the light/<target>/ directory off the Pi, point your stacker at it, and you have the same subs the live stack was built from — with as much time as you like to tune the result.
Calibration Frames
Under Advanced → Calibration Library you can build master dark and flat frames. Once a matching master exists, every subframe is calibrated with it before it is aligned and stacked — the sensor's fixed-pattern noise and the optics' vignetting never enter the stack at all.
Darks — cap the lens completely, then capture. A dark is only valid for the exact exposure, gain and binning it was shot at, so the library defaults its capture settings to whatever your current session is set to.
Flats — point at an evenly lit target: twilight sky, or a diffuser panel over the aperture. Flats are matched by binning alone. The exposure is metered against the target for you, since the exposure that fills a 30 s sky frame saturates a flat panel by orders of magnitude.
Dark flats — a flat run comes in two halves, so stay by the scope. Once the flats are done the panel stops and asks you to cap the lens and press Continue; it then shoots the same number of frames capped, at exactly the exposure it metered, and subtracts their median before the master is written.
That subtraction is not optional bookkeeping. A flat is a multiplicative map of the optical path, but the frames it is built from also carry the sensor's additive signal — the black-level pedestal. Division does not cancel an added constant: leave it in and a corner genuinely at 60% of centre reads as roughly 64%, so the flat under-corrects vignetting by a few percent, uniformly and invisibly, no matter how long you integrate. The dark that cancels it has to be at the flat's own metered exposure, which is why the run captures its own rather than looking one up.
Walk away at the prompt and the run times out after ten minutes and writes no master — half a flat run is not a calibration frame. Cancel does the same immediately. Masters built this way record DFLATSUB and NDFLAT in their FITS header, so one built before this landed is distinguishable from one built after.
The default of 20 frames is the usual astro convention — enough for the median to reject outliers and average down the read noise without the run eating your whole night. Neither "the lens is capped" nor "this is evenly lit" is detectable from the Pi, so getting the physical setup right is on you.
A capture holds the camera the same way a stacking session does, so you cannot stack and calibrate at once. You can build a master mid-session: stop stacking, capture the master, then start again — the calibration library is re-checked at the beginning of each accumulation run, so a Restart is enough to bring a fresh master online.
Masters are stored under $PHOTOS_DIR/calibration/dark/<exposure>s_bin<n>_gain<g>/ and $PHOTOS_DIR/calibration/flat/bin<n>/, and can be deleted from the same panel.
Optics and the Plate Solver
The plate solver works much faster when it knows roughly how wide your field is. It derives that from focal length and pixel size.
Leaving Focal length at 0 is fine — the first frame just takes a full-index scan. Once a frame solves, the worker measures the true plate scale, works backwards to your focal length, and writes it into the field for you. Note it down and enter it next time and your first solve gets much quicker.
Troubleshooting
Start fails with "Astro Python not found": the astro venv isn't provisioned. Run bash setup/astro-venv.sh on the Pi, or set ASTRO_PYTHON in system.env if your venv lives somewhere else.
Every frame says "Solve failed": usually one of three things — astrometry.net's index files aren't installed (bash setup/astrometry.sh), the frame has too few stars (raise gain or exposure), or the focus is soft enough that the solver can't find star centroids. Check the logs:
pm2 logs expressjs | grep astroFrames say "Discarded": they solved, but couldn't be aligned onto the reference frame or folded into the stack. Field rotation on an alt-az mount and large tracking excursions both do this. A Restart picks a new reference frame from where the scope is now.
Frames climb but the image looks the same: that's normal past the first few dozen. Stacking improves signal-to-noise with the square root of the frame count, so the visible jump from 4 to 16 frames is much bigger than from 100 to 112.
"Cannot start astro stacking while the bird watcher is active": only one thing can hold the camera at a time. Stop the bird watcher or the timelapse first.
Settings Reference
These are set in the config file, not the UI — see Configuration.
| Variable | Default | What it does |
|---|---|---|
ASTRO_SOLVER | astrometry | Plate solver to use: astrometry (solve-field) or astap |
SOLVE_FIELD_PATH | solve-field | Path to the astrometry.net solve-field binary |
ASTAP_PATH | astap | Path to the ASTAP binary, when ASTRO_SOLVER=astap |
ASTRO_SEARCH_RADIUS_DEG | 15 | Search radius around the previous solution's coordinates, in degrees |
ASTRO_FOV_HINT_DEG | unset | Field width hint in degrees, used when no focal length is configured |
ASTRO_TARGET_MAX_SEP_DEG | 1.5 | How close the solved center must be to a catalog object to name it |
ASTRO_CALIBRATION_ENABLED | enabled | Set to 0/false/no/off to skip dark/flat correction entirely |
ASTRO_PYTHON | ~/astro_venv/bin/python | Interpreter the stacking and calibration workers run under |